Schema Import 
Schema Import is available to Pro and Enterprise users, on user Workspaces only.
You can use Schema Import to upload your files and automatically generate the corresponding Rune model files in your Workspace. The generated files are added as a new namespace, which you can immediately use for modelling and for test-pack ingestion.
Each format has its own options and produces a different result, so each is documented in its own section below.
In this section, you will learn about:
- Accessing Schema Import
- Choosing an import format
- Importing an XSD schema
- Inferring a schema from CSV samples
- Validation and Error Handling
Accessing Schema Import 
There will be an Import Schema button in the Namespace Explorer. Selecting it opens the Import Schema wizard, a multi-step modal dialog that guides you through uploading your files and generating a Rune model from them.
Choosing an import format 
Before the numbered steps begin, the wizard asks how you want the model to be created:
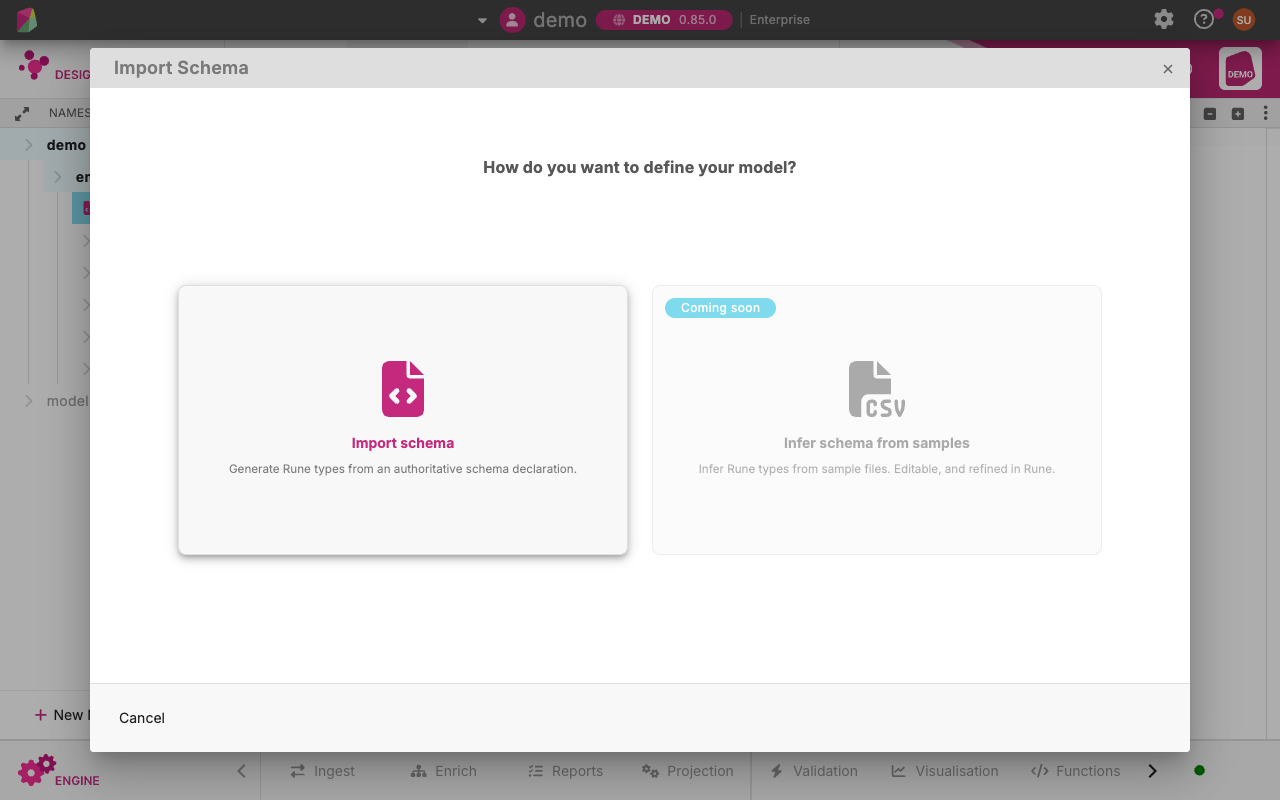
- Import schema generates Rune types from an authoritative schema declaration (
.xsd) — see Importing an XSD schema. - Infer schema from samples infers Rune types from sample files (
.csv), and its upload step also configures how those samples are read — see Inferring a schema from CSV samples.
Either choice then runs the same four steps — Upload, Configure, Review and Import — and what each step asks for is what differs between them. Selecting a format takes you straight into its first step; there’s no separate Next on this screen.
Importing an XSD schema 
Step 1: Upload Schema 
On the Upload step, you upload either a single .xsd file, several .xsd files, or a single .zip file containing .xsd files.
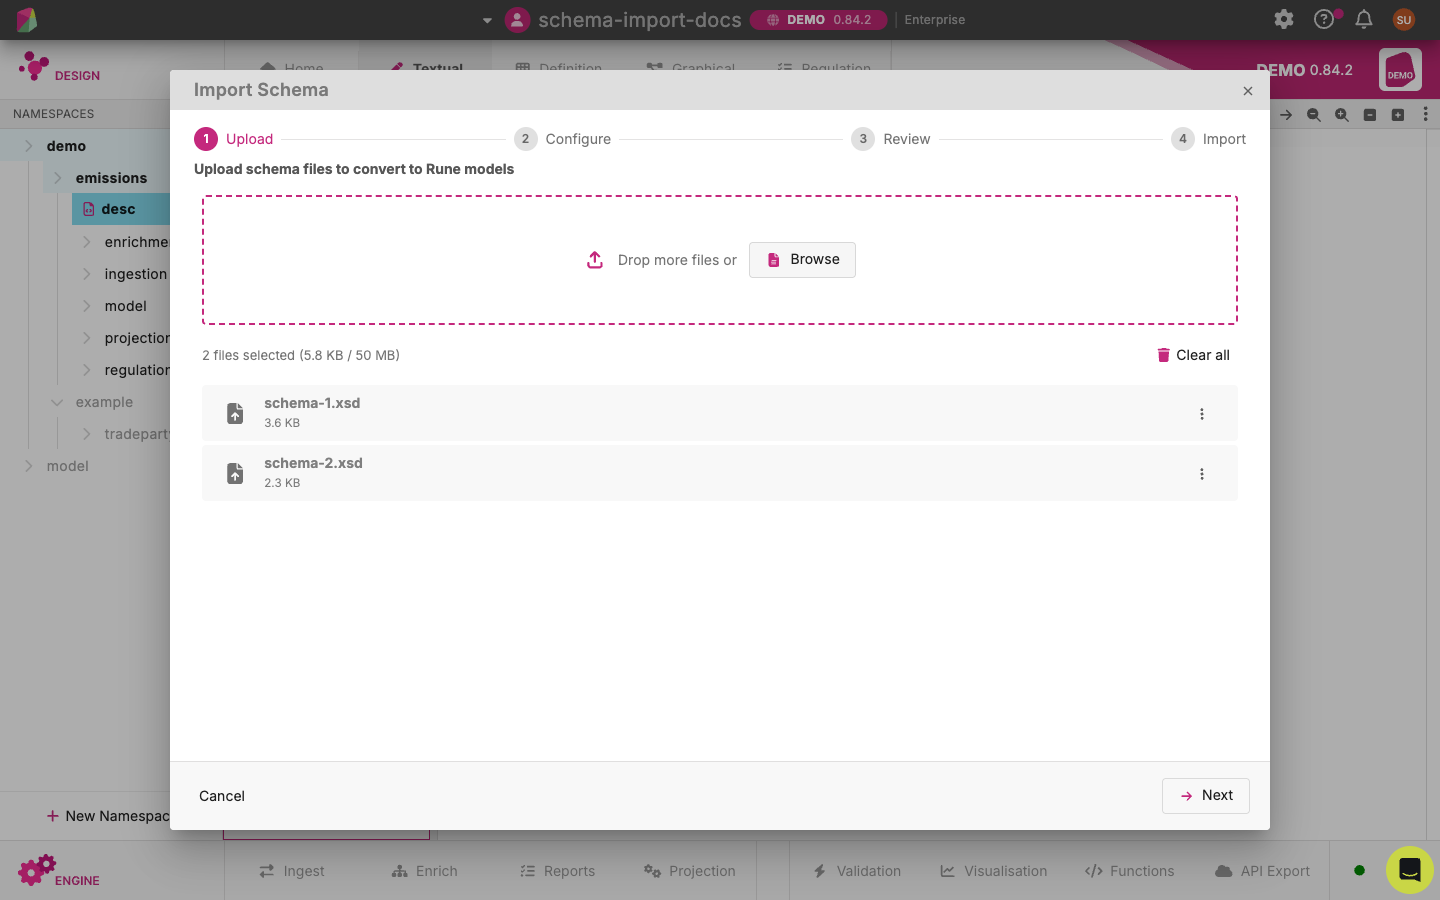
You can add files by dragging and dropping them onto the drop zone, or by using the Browse files button. Files are validated as soon as you upload them:
- Only
.xsdand.zipfiles are accepted. - The combined size of all uploaded files must not exceed the maximum total size (50 MB).
Selecting Back on this step returns to the format screen; any files you’ve already uploaded are preserved and reappear if you choose the same format again.
Step 2: Configure Import 
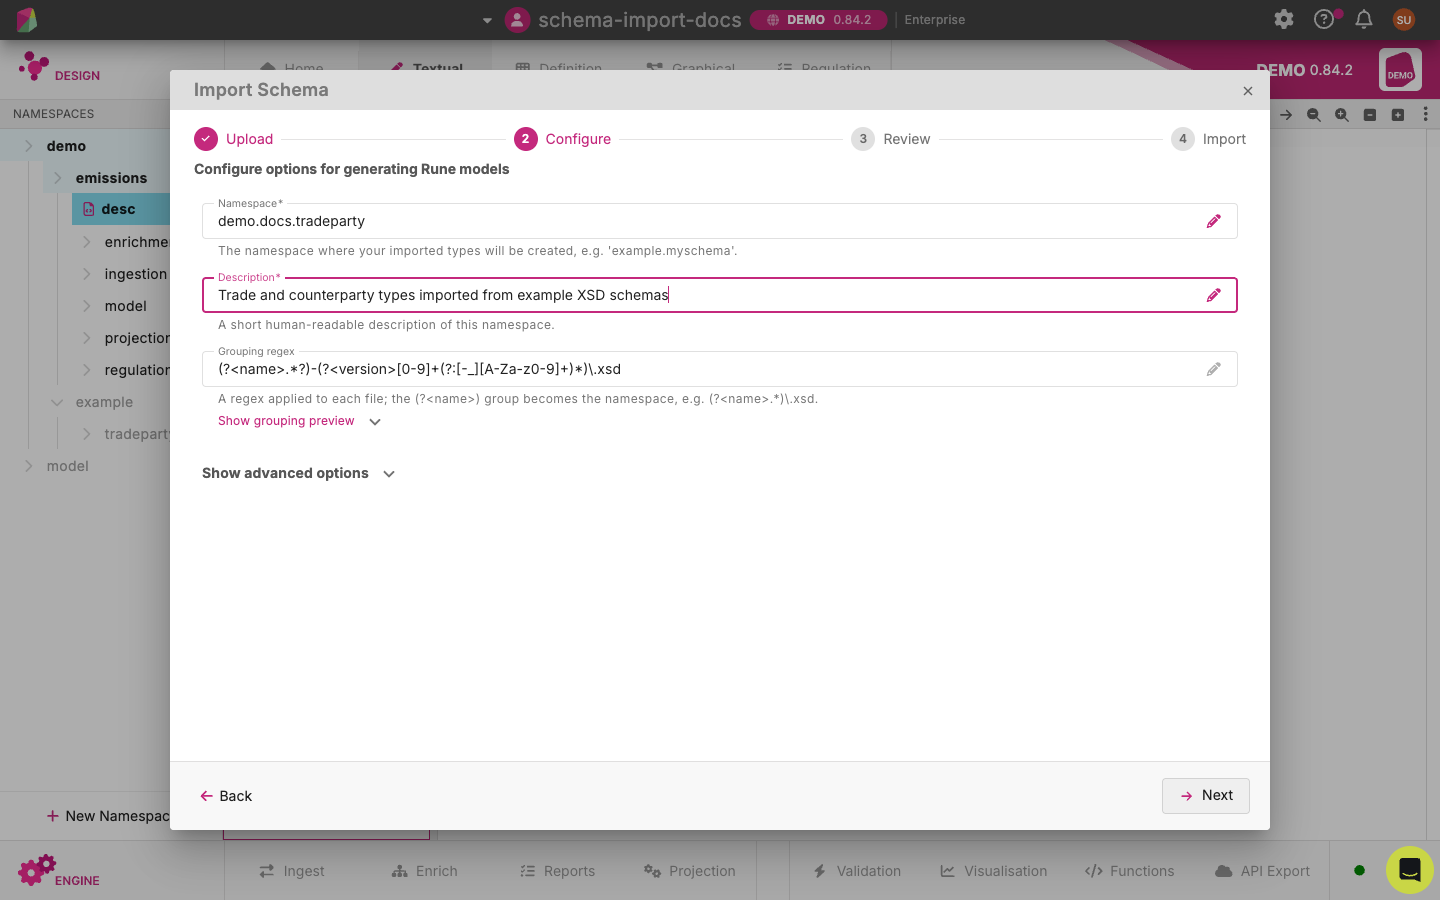
Once you’ve uploaded and validated your files, the Configure step lets you define how the uploaded schema is converted into a Rune model. Basic options are always visible; more advanced options are grouped under a collapsible section.
Basic options 
| Option | Description | Default |
|---|---|---|
| Namespace | The namespace under which the imported types will be created (e.g. example.myschema). Your Workspace’s namespace prefix is shown before the field and added automatically. If a namespace with the same name already exists in your Workspace, you’re asked to choose a different namespace. | (required, no default) |
| Description | A short, human-readable description of the namespace. | (none) |
| Grouping regex | A regex applied to each uploaded file path; the named (?<name>...) capture group is used to derive the target namespace for that file. You can show a live preview of the resulting namespace mapping. | Automatically inferred from the uploaded file names. |
Show grouping preview displays how each uploaded file will be mapped to a namespace, based on the current grouping regex.Advanced options 
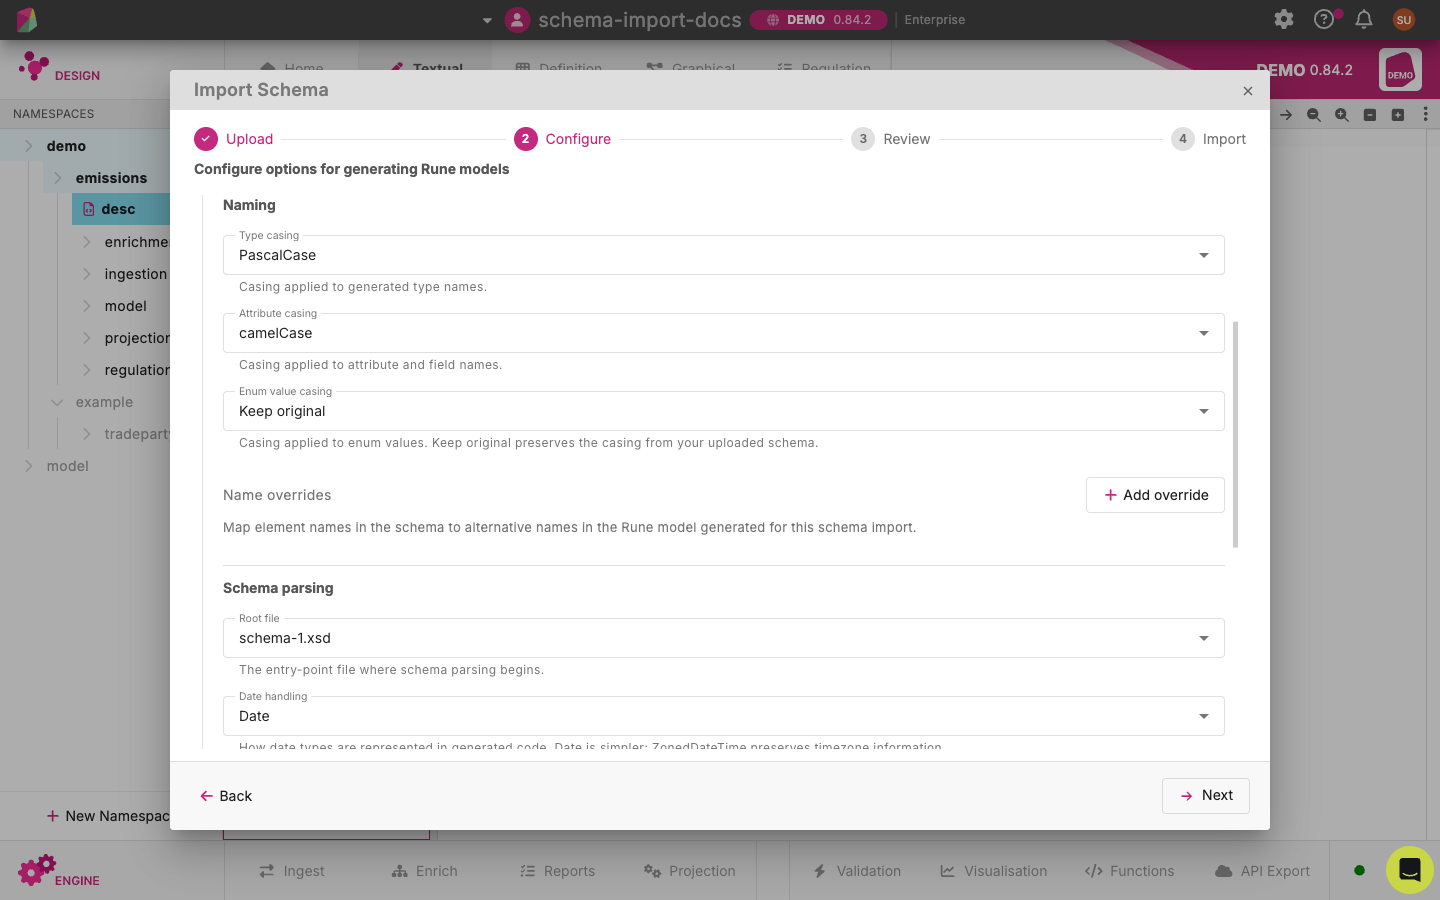
Selecting Show advanced options reveals additional settings for fine-tuning the generated model. These options default to values that produce sensible output without any further configuration, so you don’t need to open this section the first time you import a schema.
Naming 
| Option | Description | Default |
|---|---|---|
| Type casing | Casing style applied to generated type names — PascalCase, camelCase, Keep original, lower_snake_case or UPPER_SNAKE_CASE. | PascalCase |
| Attribute casing | Casing style applied to attribute and field names — the same choices as Type casing. | camelCase |
| Enum value casing | Casing style applied to enum values — the same choices as Type casing. Keep original preserves the casing used in the uploaded schema. | Keep original |
| Name overrides | Maps element names in the schema to alternative names in the generated Rune model. | (none) |
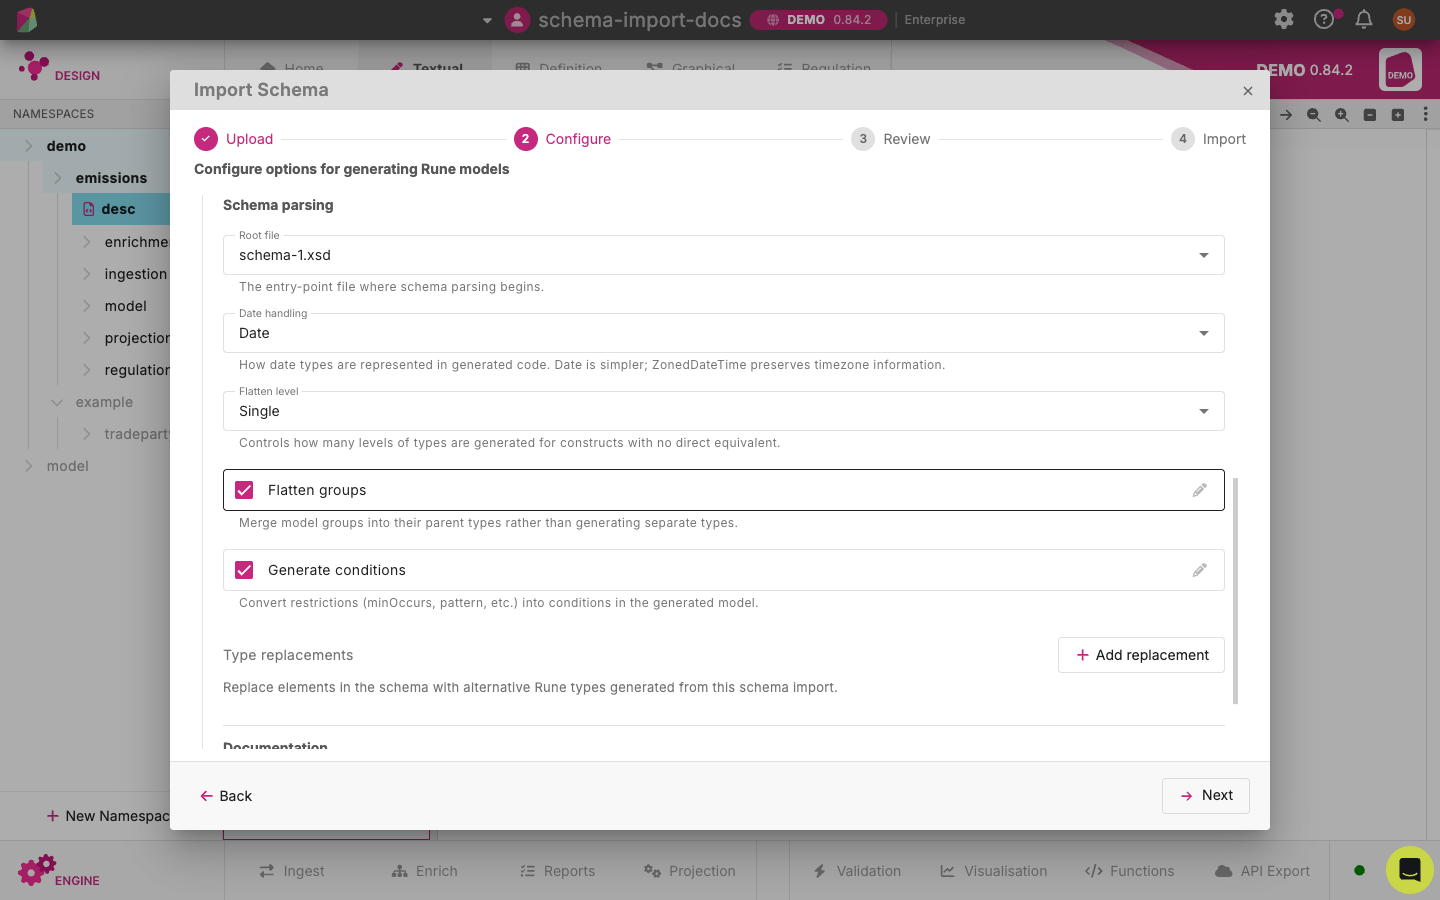
Schema parsing 
| Option | Description | Default |
|---|---|---|
| Root file | The entry-point XSD file from which schema parsing begins. Selected from the files you uploaded in Step 1. | The uploaded file whose name contains main, otherwise the first uploaded file. |
| Date handling | How XSD date types are represented in the generated model. Date is simpler; ZonedDateTime preserves time-zone information. | Date |
| Flatten level | Controls how many levels of virtual types are generated for XSD constructs (e.g. groups, extensions) that have no direct Rune equivalent. | Single |
| Flatten groups | Merges XSD model groups into their parent types rather than generating separate types. | Enabled |
| Generate conditions | Converts XSD restrictions (minOccurs, pattern, etc.) into Rune conditions. | Enabled |
| Type replacements | Replaces elements in the schema with alternative Rune types generated from a previous schema import; intended for use when you’re extending an existing Rune model. | (none) |
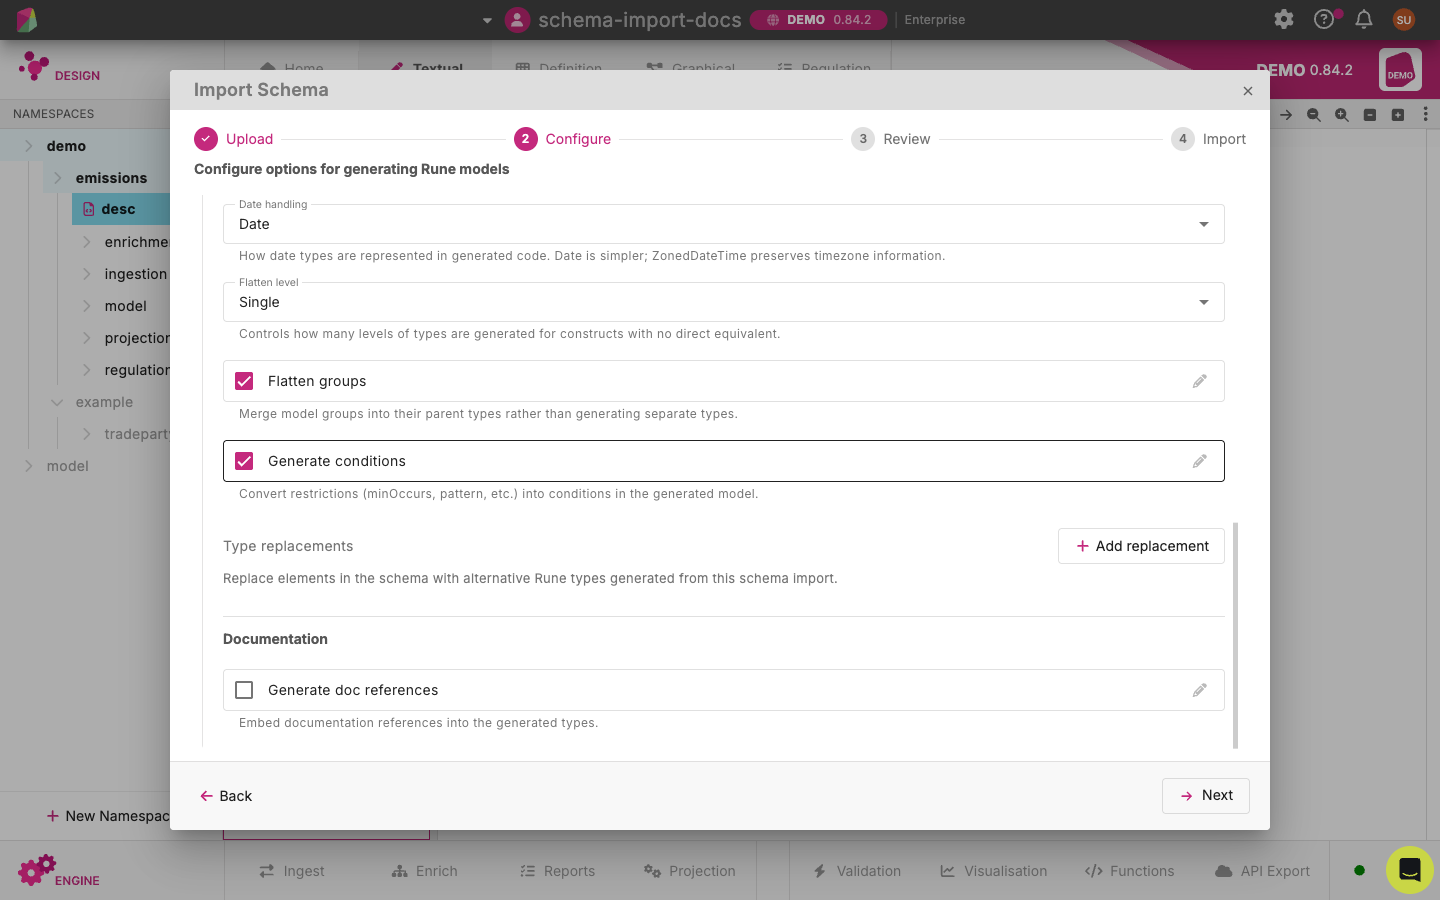
Documentation 
| Option | Description | Default |
|---|---|---|
| Generate doc references | Embeds documentation references (body, corpus and corpus description) into the generated types. When enabled, reveals the Body and Corpus fields below. | Disabled |
| Body | The standards body that issued the schema. Required when Generate doc references is enabled. | (none) |
| Corpus | The document corpus. Required when Generate doc references is enabled. | (none) |
| Corpus description | A short description of the corpus. | (none) |
Step 3: Review and Confirm 
The Review step lists every file you uploaded under Uploaded Files, together with the namespace it will be mapped to based on the configured grouping regex, followed by a Configuration summary of your chosen options. Any option still on its default value is marked (default).
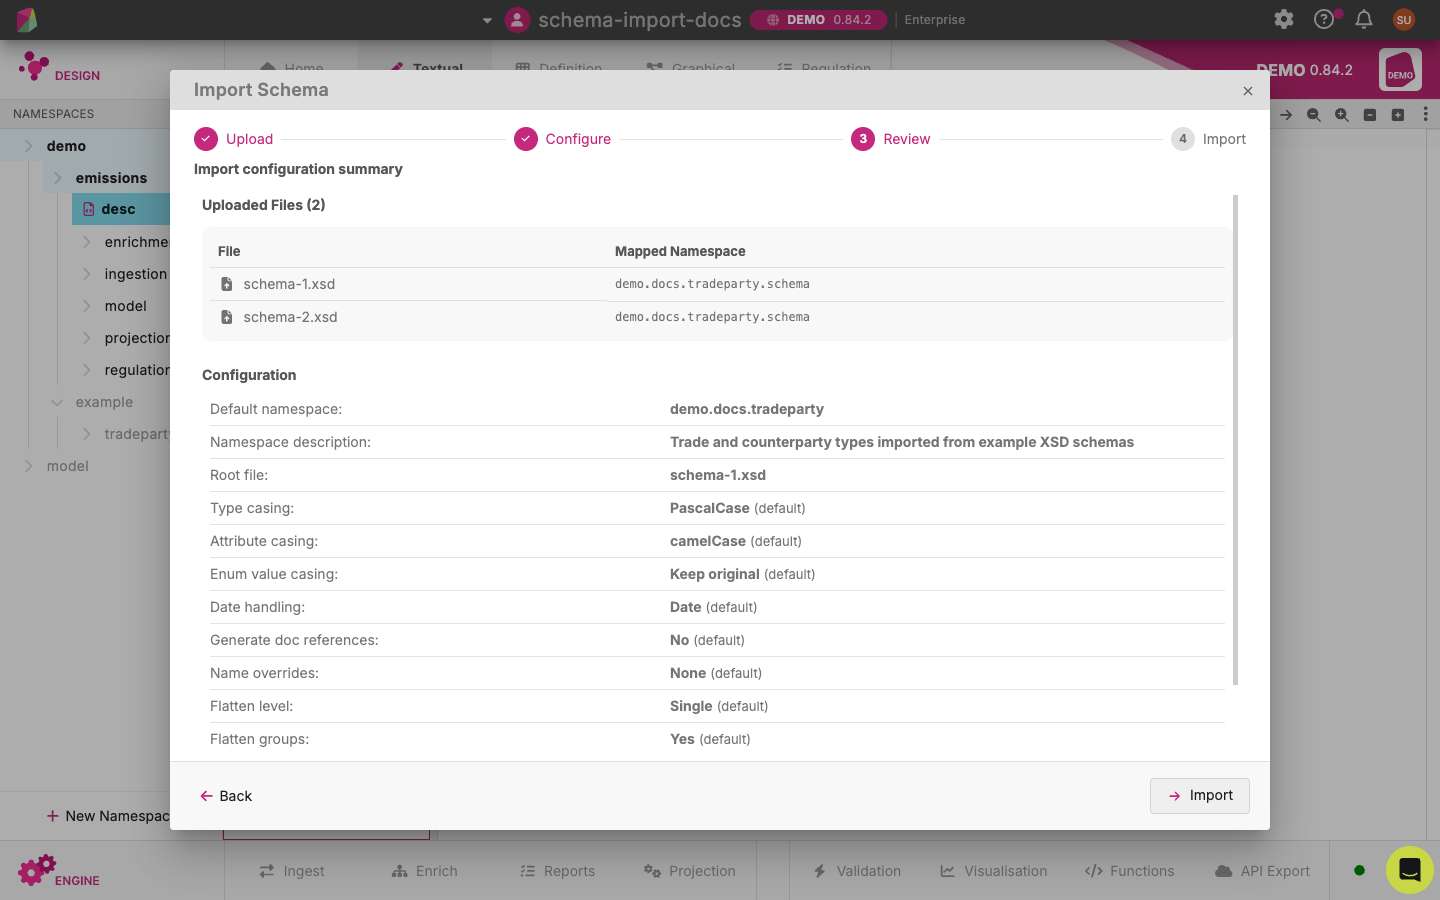
Selecting Import triggers the backend import job. A loading indicator is shown for the duration of the import, and you can’t close the wizard until the import completes.
Step 4: Import Result 
On success, the wizard confirms that the model has been imported and lists the namespaces that were generated.
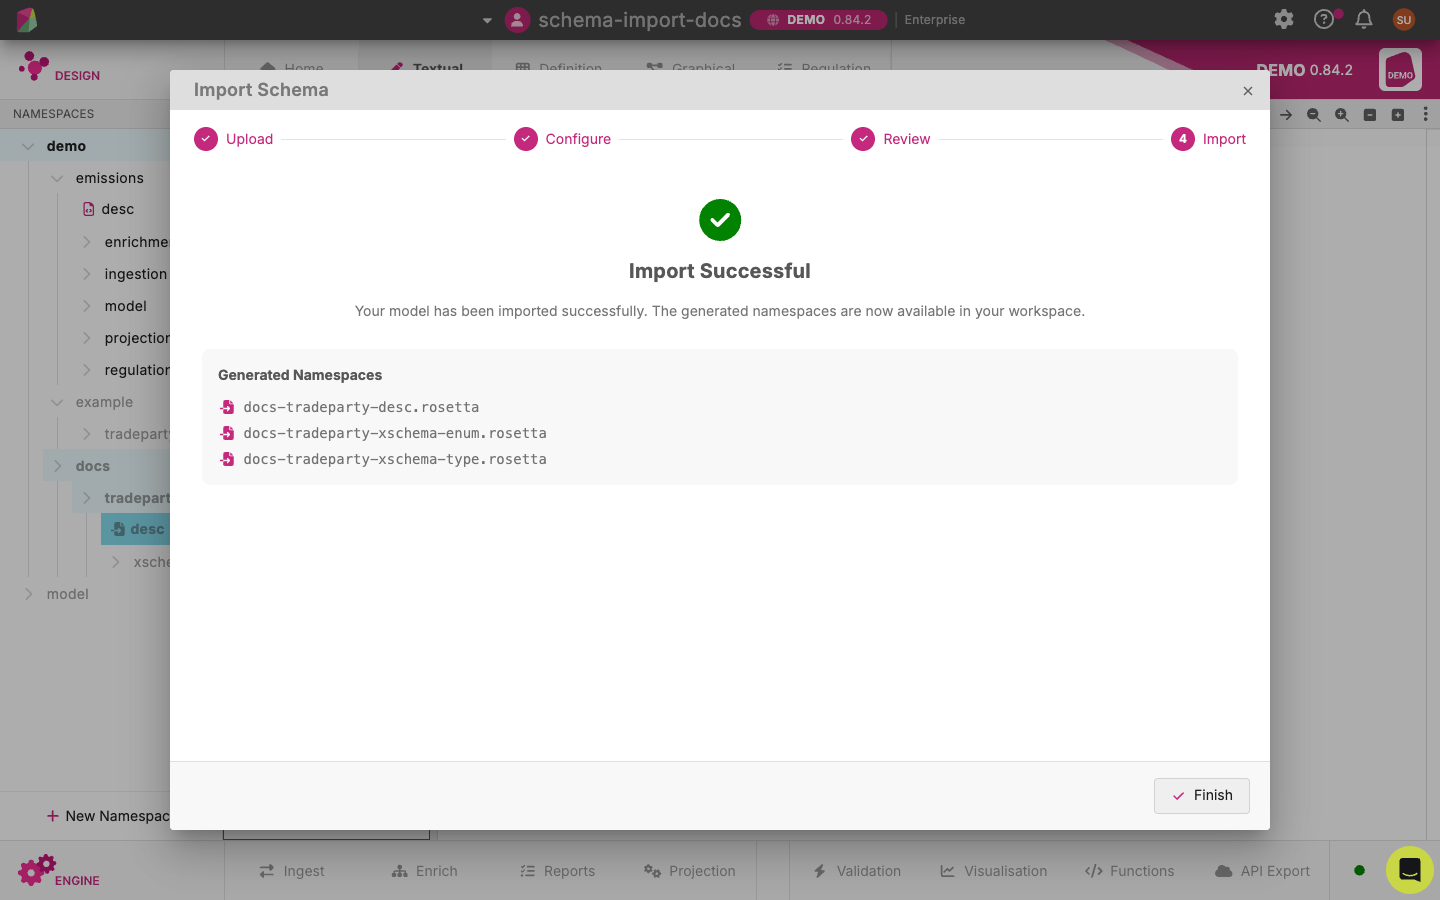
Once you select Finish:
- Your Workspace file tree updates to show the newly imported Rune files.
- Imported files are visually marked as read-only: you can delete and re-import them at the namespace level, but you can’t edit them at the file level.
Closing the wizard leaves you in the Workspace with the generated namespace open. Two things mark it as imported rather than authored by you:
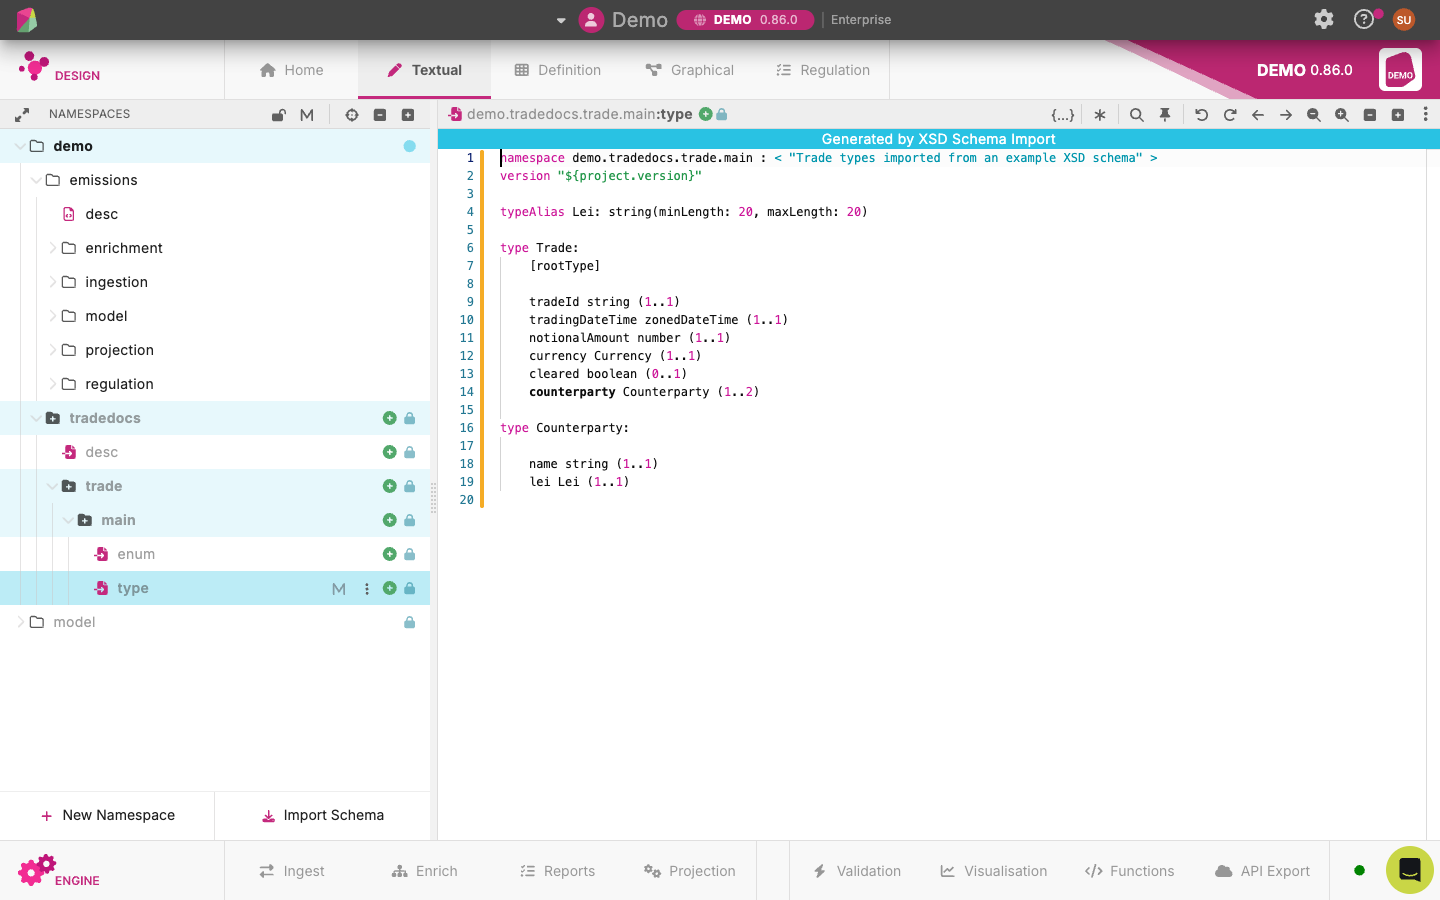
- The editor banner. Any generated file opens with a band across the top of the editor naming the import that produced it —
Generated by XSD Schema Importfor the import above. A namespace whose origin isn’t recorded readsGenerated by Schema Import. - The namespace tree icons. An imported namespace shows a folder-with-a-plus glyph, and each of its files a file-with-an-arrow glyph, in place of the plain folder and file icons an authored namespace uses — hovering either names the import in the same words as the banner. The padlock beside the name marks the row read-only, with the tooltip
XSD imports are read-only.
The circle-plus badge on those rows is about versioning rather than importing: it marks a namespace as new, with no earlier version to compare against.
On failure, a human-readable error message is displayed, no files are added to your Workspace, and your configuration selections are preserved so you can retry the import without starting over. If the failure is caused by an unsupported schema feature, the error names the feature.
Inferring a schema from CSV samples 
Instead of an authoritative schema, you can point the wizard at one or more CSV sample files. Rather than declaring types up front, the importer infers a flat Rune type from the values it sees: column headers become attribute names, value shapes become attribute types, and the original header text is preserved as a label. Because samples can’t carry documentation, enumerations or constraints the way a schema does, the generated model is a stub: it works immediately, and you keep refining it directly in Rune afterwards.
Step 1: Upload Samples 
On the Upload step, you upload one or more .csv sample files, or a single .zip containing .csv files. Several samples can be uploaded together — the importer unions what it infers from all of them into a single type. The same combined size limit applies as for an XSD import (50 MB).
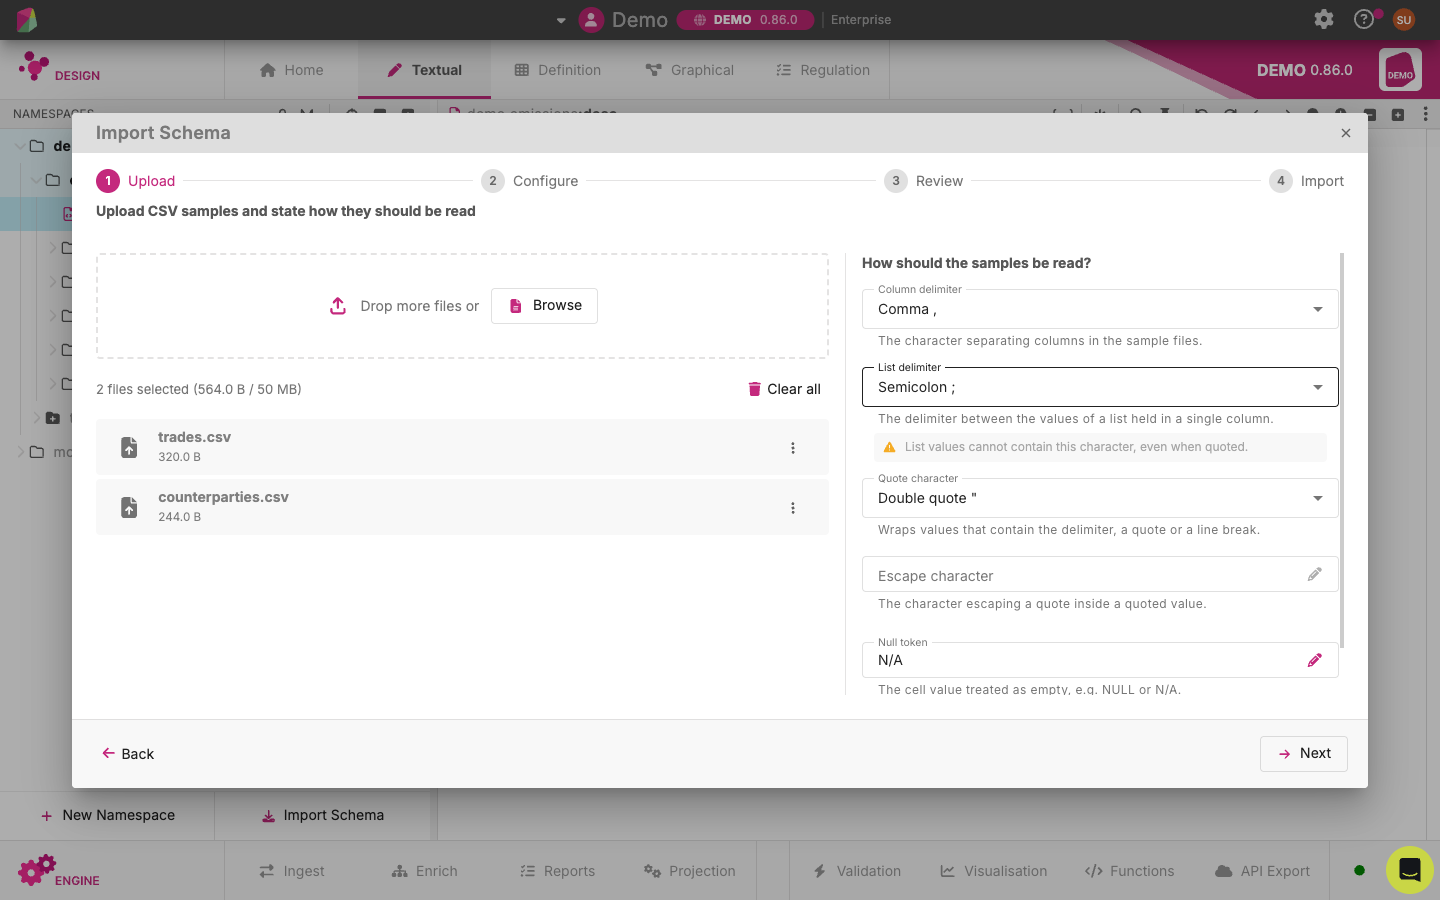
Alongside the drop zone, under How should the samples be read?, you state how the samples are to be parsed:
| Option | Description | Default |
|---|---|---|
| Column delimiter | The character separating columns. Choose comma, semicolon, tab or pipe, or select Other and type a different single character. | Comma , |
| List delimiter | The delimiter between several values held in one column. Choose one of the same characters, select Other and type a different one, or leave it on None if no column in your samples holds a list. Once you choose one, the step warns that list values cannot contain that character, even when quoted. | None |
| Quote character | Wraps values that contain the delimiter, a quote or a line break. Choose double or single quote, or select Other and type a different single character. | Double quote " |
| Escape character | The character escaping a quote inside a quoted value. Left empty, the importer assumes RFC 4180, which doubles the quote instead. | (empty) |
| Null token | The cell value treated as empty, for example NULL or N/A. | (empty cell) |
Each of these is a single character. The column delimiter and quote character are required; the list delimiter, escape character and null token can all be left unset. The quote, escape and list characters must each differ from the column delimiter — otherwise the step shows that as an error and Next stays disabled. Next is also disabled until you’ve chosen at least one sample file.
Headers are read as attribute labels: Trading Date Time in a sample becomes the label of an attribute named tradingDateTime.
Back to this step and continue again — your samples are read again from scratch rather than patched in place.Step 2: Configure Import 
The Configure step names the generated type and lets you correct what inference produced. While the server checks your configuration, a Validating… spinner replaces the form.
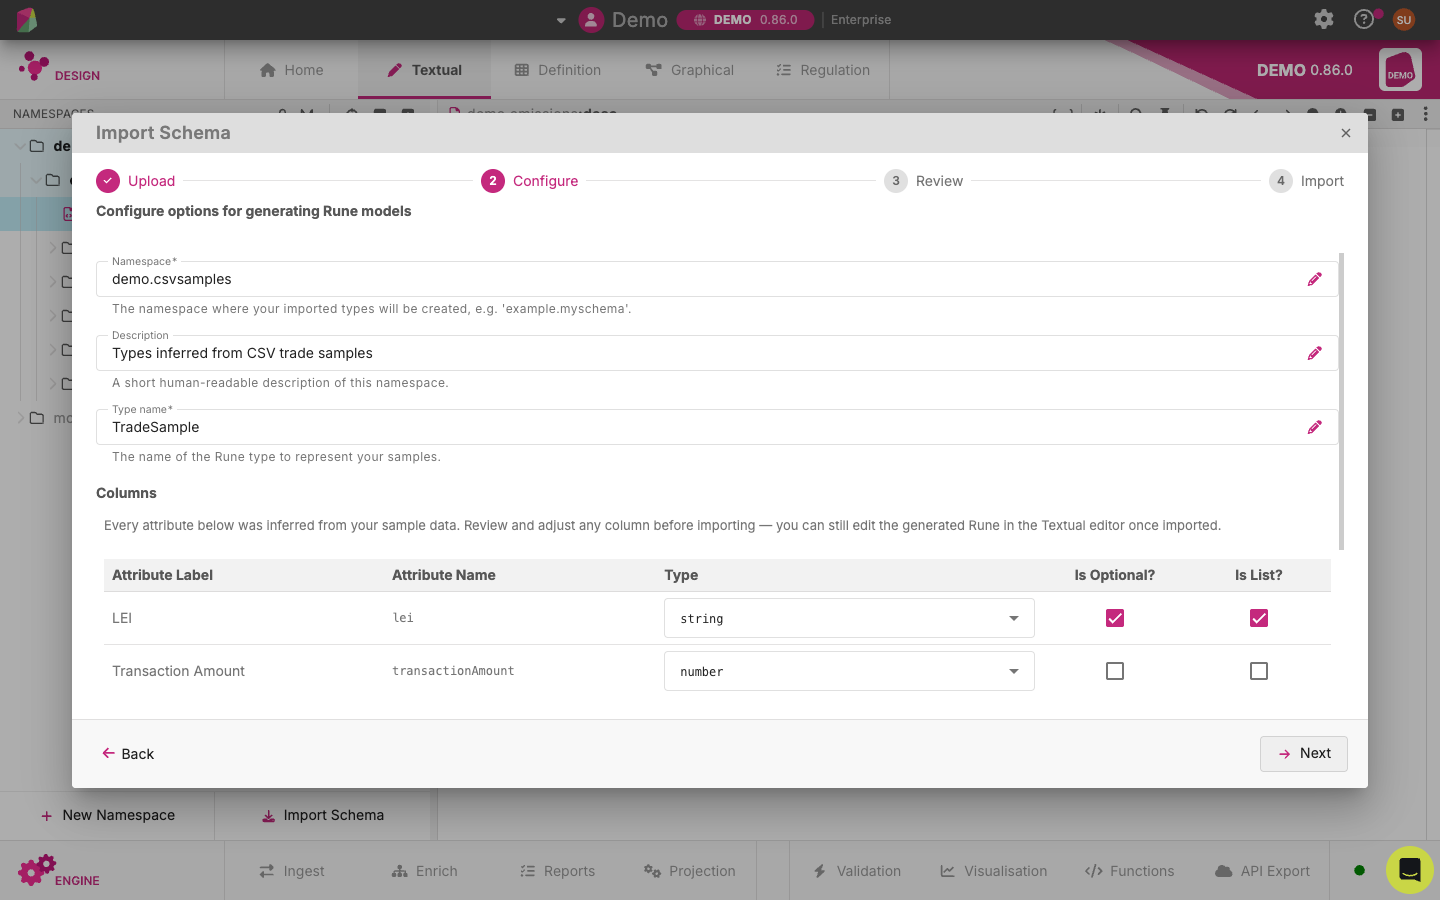
| Option | Description | Default |
|---|---|---|
| Namespace | The namespace where the generated type will be created (e.g. example.myschema). Your Workspace’s namespace prefix is shown before the field and added automatically. | (required, no default) |
| Description | A short, human-readable description of the namespace. | (none) |
| Type name | The name of the single Rune type generated from your samples. | (required, no default) |
Unlike an XSD import, a CSV import asks nothing else: there are no casing, parsing or documentation options, and no advanced section. A generated attribute name is only ever as good as the header it came from, so renaming is done in the Textual editor after the import.
Under Columns, one row per inferred column shows what the importer made of it:
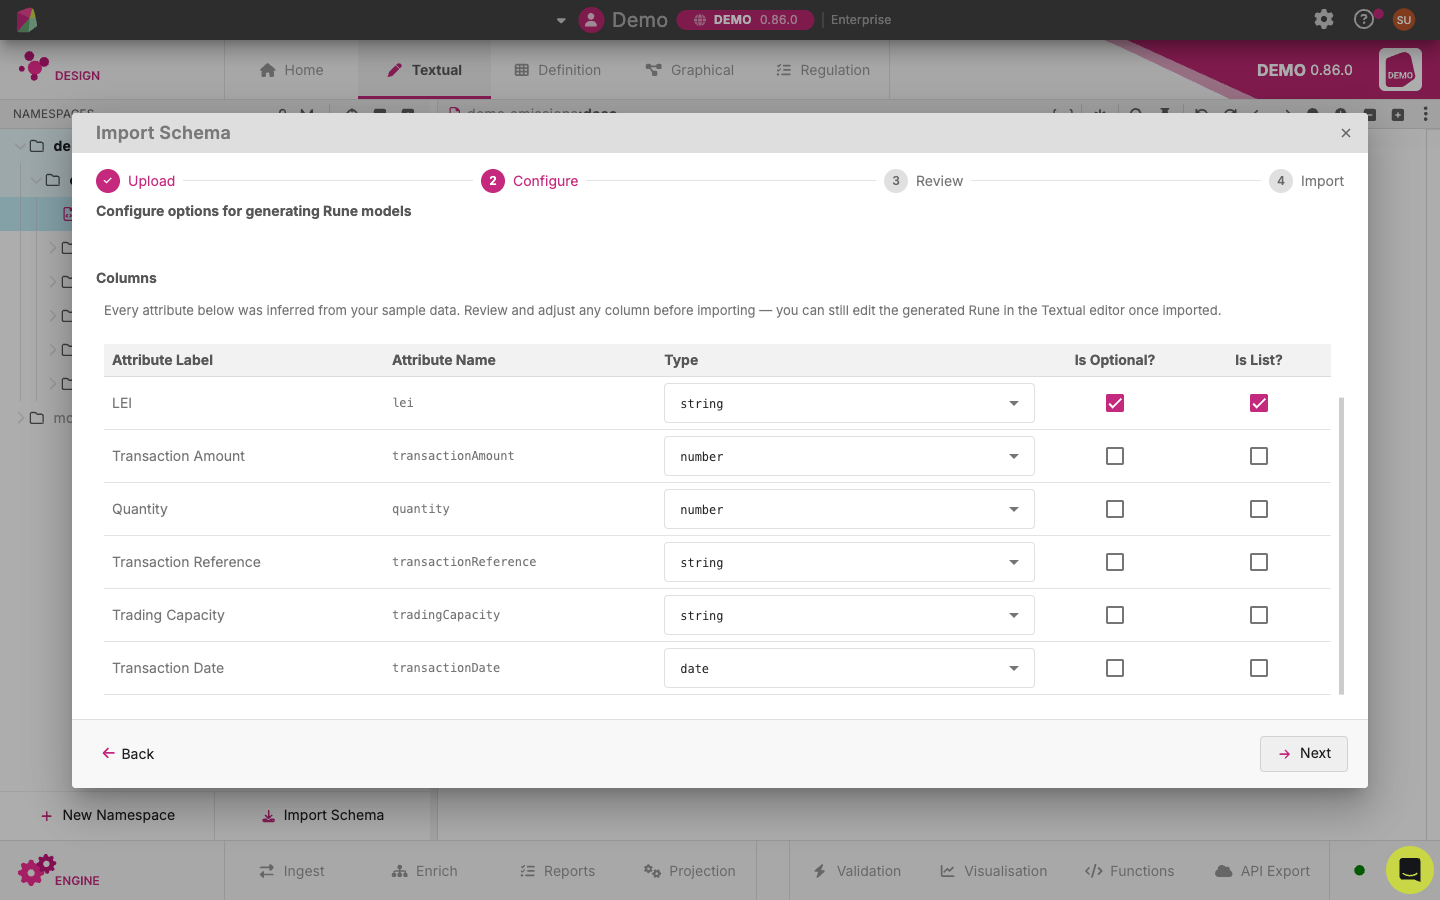
| Column | Editable | Description |
|---|---|---|
| Attribute Label | No | The header text the column came from. |
| Attribute Name | No | The attribute name inferred from that header. |
| Type | Yes | The Rune type of the generated attribute: string, int, number, boolean, date, time, dateTime or zonedDateTime. A column the importer couldn’t type must be given one before you can leave the step. |
| Is Optional? | Yes | Whether the attribute is optional. |
| Is List? | Yes | Whether the column holds a list, split on the list delimiter stated in Step 1. |
If nothing has been inferred, the grid reads No columns have been inferred from these samples yet.
Editing the grid doesn’t re-read your samples: it overrides the result of the Step 1 parse. Inference can recover shape, but not everything a modeller would want — length constraints, patterns, complete enumerations and documentation aren’t present in sample data, so you add those afterwards directly in the generated .rosetta files.
Step 3: Review and Confirm 
The Review step lists the inferred columns read-only under Columns, followed by a Configuration summary: the namespace and its description, the type name, and the read options the columns came from — column delimiter, quote character, escape character, list delimiter and null token. Any option still on its default value is marked (default).
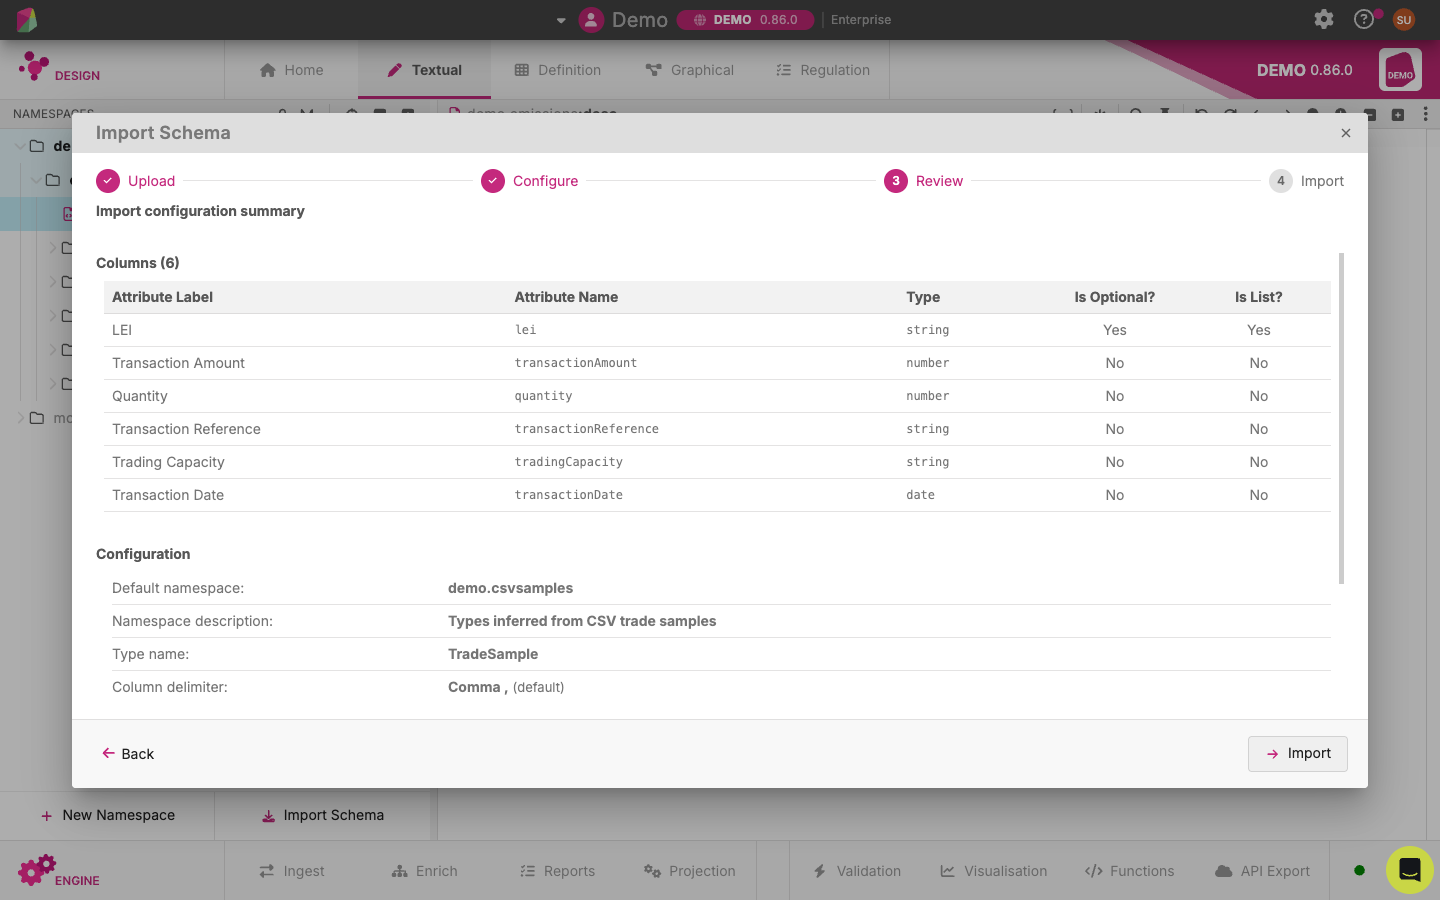
Selecting Import triggers the backend import job, the same way it does for an XSD import.
Step 4: Import Result 
On success, the wizard confirms that the type has been generated and lists the files it wrote. The result screen is the same one an XSD import ends on:
Unlike an XSD import, a namespace generated from CSV samples is editable, not read-only: it’s ready to ingest CSV matching your samples with no further setup, and you can keep refining it in place — narrowing types, completing enumerations, adding documentation — without that work blocking you from using it first.
Validation and Error Handling 
Schema Import validates your uploaded files and your chosen configuration at several points:
- File validation: file type and combined size limits are checked as soon as you upload files, before staging.
- Read options (CSV only): the column delimiter and quote character are required, each read option must be a single character, and the quote, escape and list characters must each differ from the column delimiter.
- Namespace validation: the chosen namespace must not already exist in your Workspace, and must not collide with a namespace produced by the import itself.
- Configuration validation: your configuration is checked against the staged files and the existing Workspace before the import is run — for an XSD import, that includes checking that the root file is one of the files you uploaded.
- Schema validation (XSD only): the uploaded schema is checked for parse errors and for XSD constructs that aren’t yet supported.
- Column validation (CSV only): every inferred column must resolve to a Rune type, so a column the importer couldn’t type has to be given one on the Configure step.
If your staged session has expired, or was never created (for example, if you leave the wizard open for too long), you’re asked to re-upload your files and configure the import again.