Rosetta Engine 
Rosetta Engine is a run-time execution engine that can run the functional logic contained in a model on physical data. Once this functional logic has been modelled, Rosetta Engine transforms it into an executable data pipeline using the source code that is automatically generated from that model.
The Rosetta Engine is provided with a user interface in the Rosetta web application and also as an API. The API takes model objects as inputs, executes the data pipelines and returns the output. This API can be deployed either on cloud or on premise.
In combination with other components of the Rosetta Platform (e.g. Rosetta Design, Ingest and Monitor), Rosetta Engine supports the regulatory reporting capability of the platform. When used for regulatory reporting purposes, the API can execute regulatory rules to create the reports required by regulators from their regulated entities.
Main characteristics 
- Generic: Rosetta Engine can transform any data processing model into a physically executable data pipeline. The engine is made available under a comprehensive set of programmatic languages.
- Live: Rosetta Engine can execute a data pipeline in real-time as user define their data processing model. This enables a test-driven approach where a model is developed together with a set of test scenarios.
- Scalable: Rosetta Engine scales based on the number of data objects that need to be processed.
Digital Regulatory Reporting 
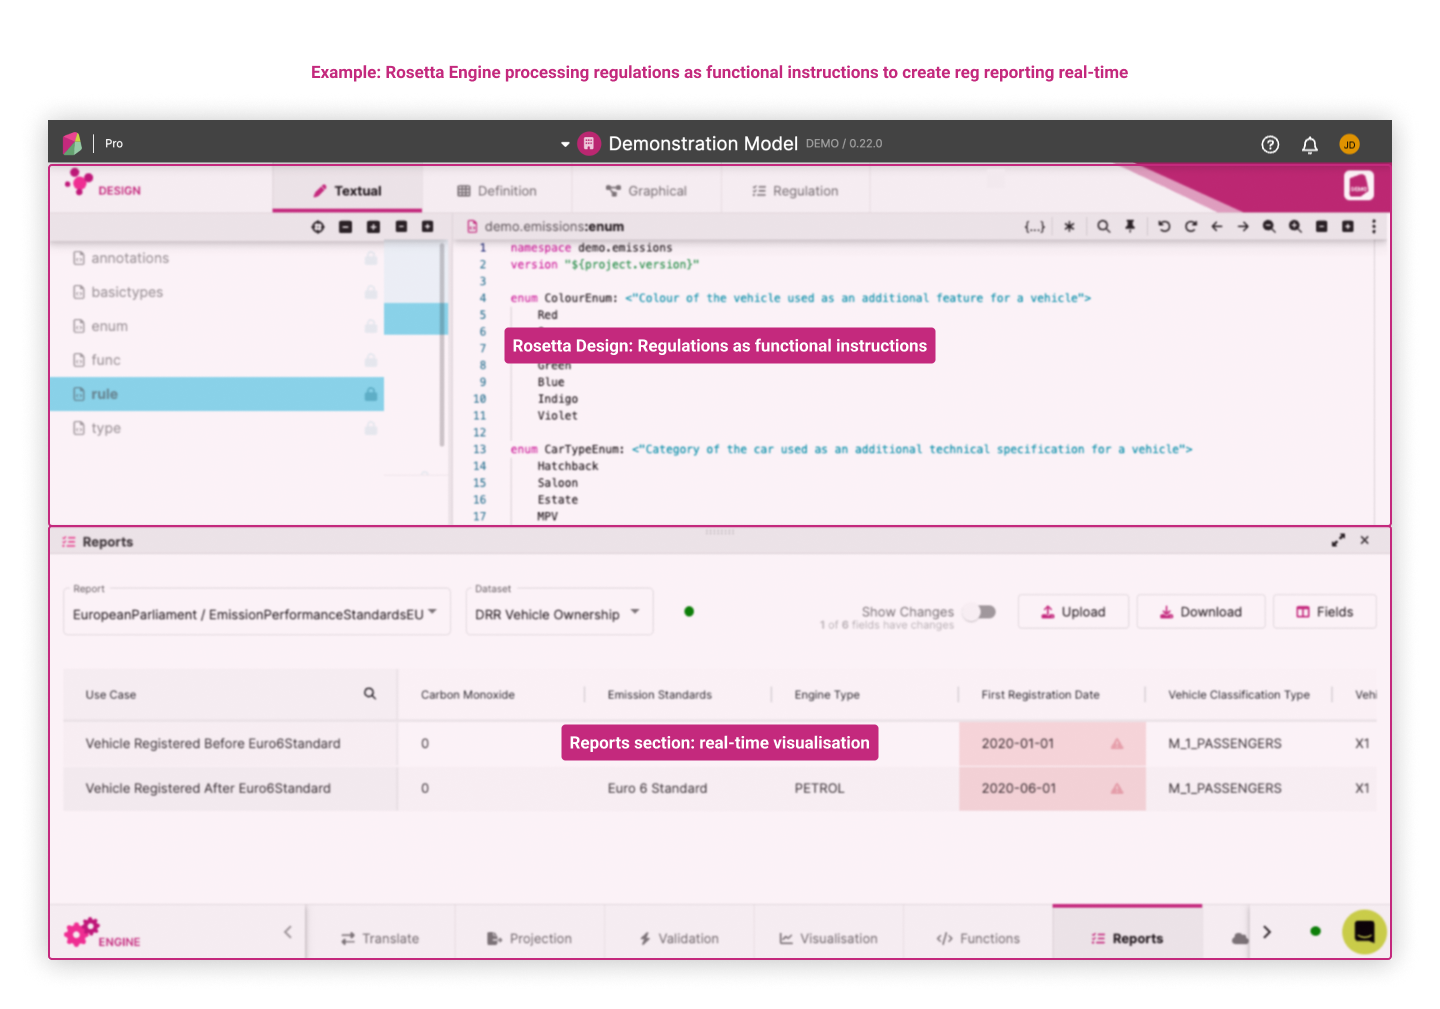
The Rosetta Platform provides a version of the Rosetta Engine that has been customised for regulatory reporting purposes and supports an industry process called Digital Regulatory Reporting (DRR). In DRR, industry participants use the Rosetta Platform to digitise the framework for reporting and collecting regulatory data, therefore mutualising the interpretation of reporting rules and their technical implementation.
The DRR approach is based on 3 principles to implement regulations:
- model-driven
- functional
- test-driven
Under this approach, regulatory reports are defined as data pipelines. Each pipeline consists of a set of regulatory rules defined as logical instructions (i.e. functions) applied to model objects. Rosetta Engine provides the pipeline's execution engine that produces the regulatory reports to be consumed by regulated entities and regulators. Those reports are shown in the Reports Feature that is accessible from the bottom banner.
The next section describes how users can practically apply the 3 principles of DRR to build regulatory reports.
Step-by-step approach for regulatory reporting in Rosetta 
Step 1: Develop a model 
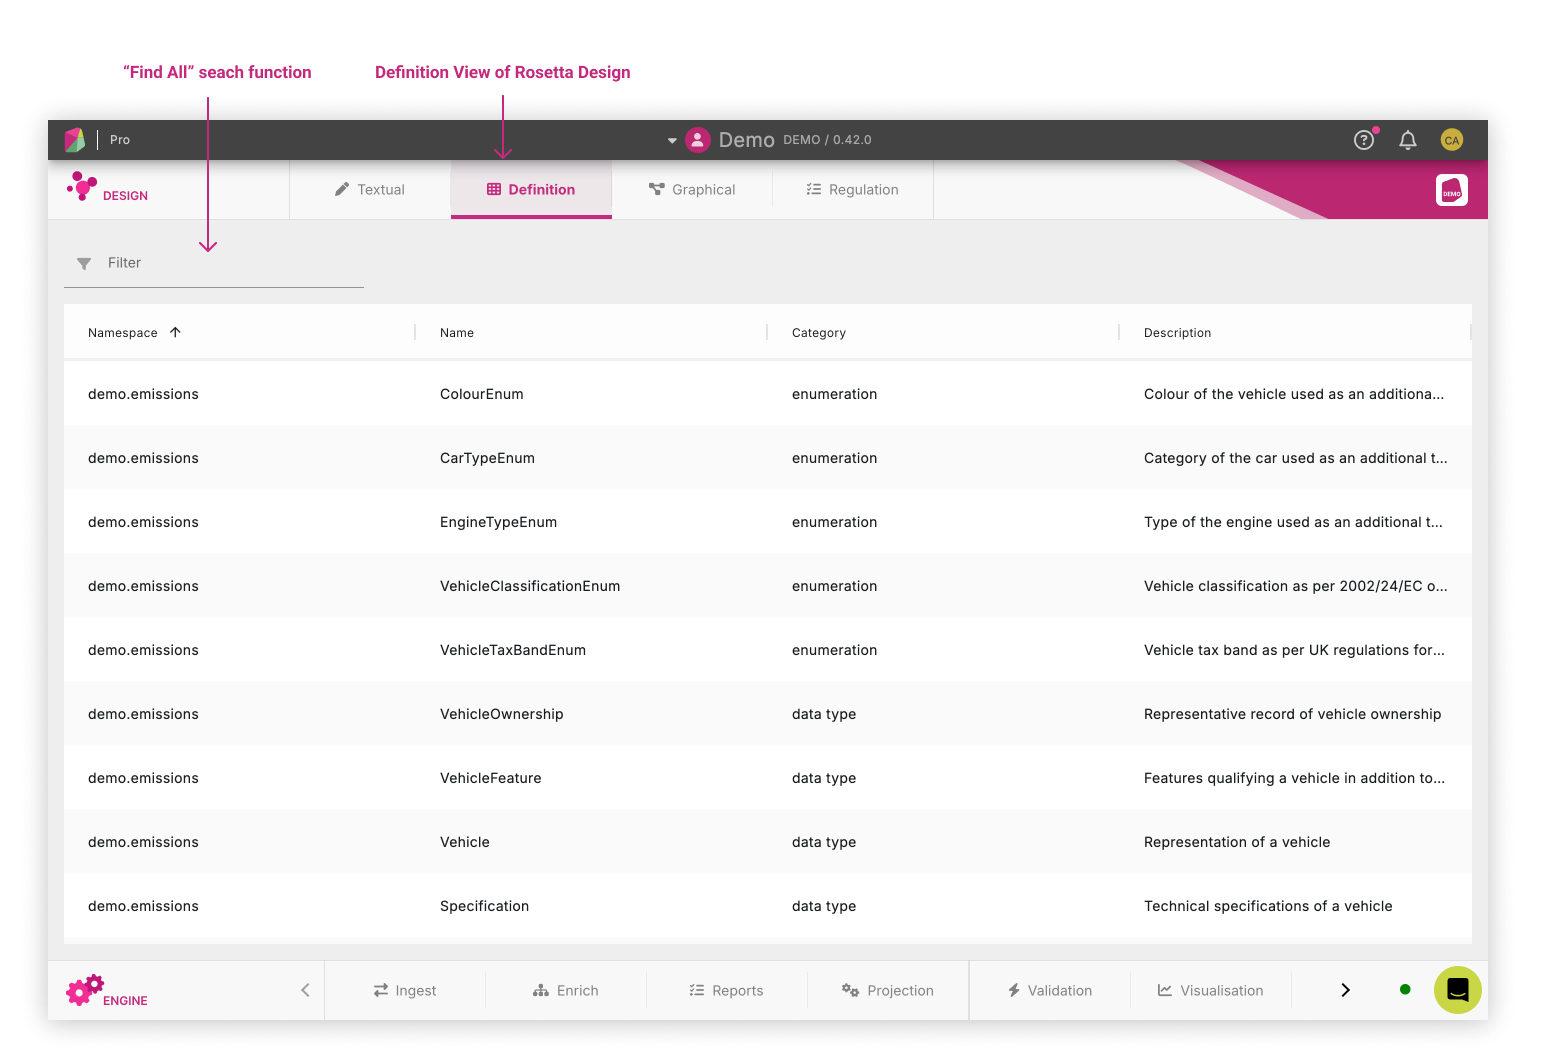
The initial step consists in building a regulatory-agnostic model for the business process or activity being regulated. This model supports the definition of the objects that will be used as inputs to create the report.
In the below example based on the Demonstration Model, the Definition View in Rosetta Design is showing the components of the model filtered by Type.
Step 2: Represent regulations as functional expressions 
The process to define a regulatory report has 3 parts:
- Define and organise the set of regulatory documents that will be referenced by the rules
- Define rules as functional expressions that reference specific provisions in those documents
- Define a report by collecting and chaining those rules together
The Rune DSL provides a simple and intuitive syntax to represent those 3 components. Complete information about that syntax can be found in the Reporting Components section of the Rune DSL documentation.
1. Start from the regulatory text 
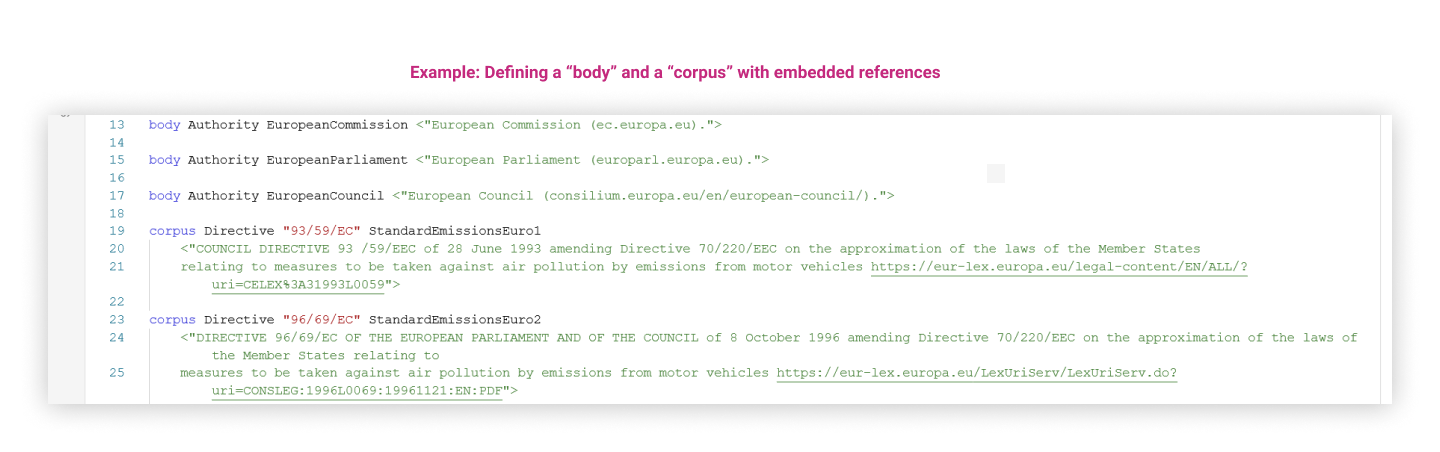
First, in order to define a regulatory report in the model, the set of regulatory documents that will be referenced by the rules need to be accessed, with extraction of key information:
- The entity that has issued the regulation, represented as a
bodyin the regulatory model - The document defining the regulation itself, represented as a
corpusin the regulatory model
Both are referenced throughout the report definition.
2. Define rules as functional expressions with references to regulatory provisions 
Each reportable field contained in a corpus can be defined by its references to specific provisions and by the reporting rules, represented as functional expressions, that will generate the corresponding reportable value from a model object.
The definition of a reporting rule in the regulatory model contains the following elements (with corresponding syntax):
- Field name and description:
reporting rule <Name> - Regulatory reference indicating body, corpus and location in the regulatory text, and the provision text:
[regulatoryReference <Body> <Corpus> <Segment1> <Segment2> <…> provision <”ProvisionText”>] - The functional expression used to generate the reportable value:
extract <Expression>,filter when <FunctionalExpression>etc. - The field name used when visualising the report:
as <FieldName>
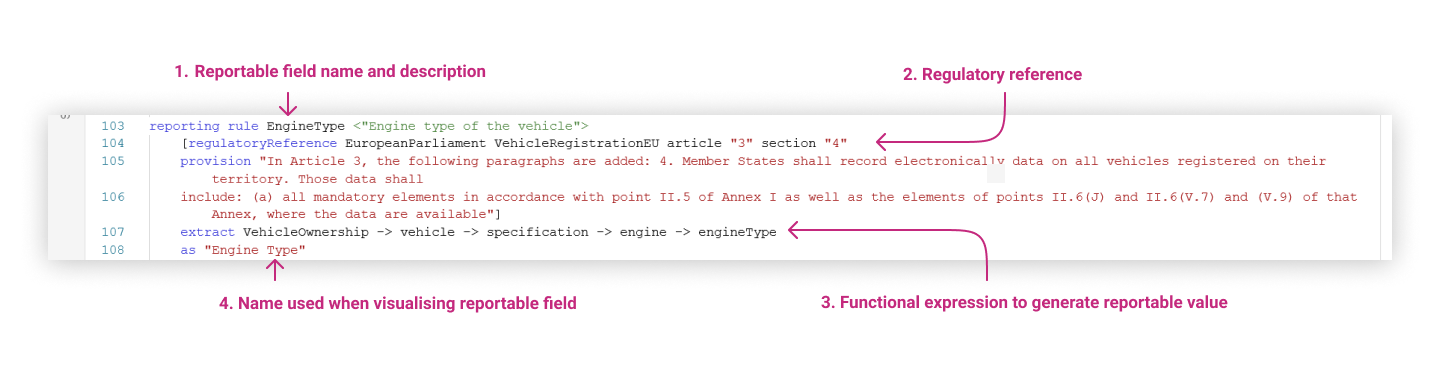
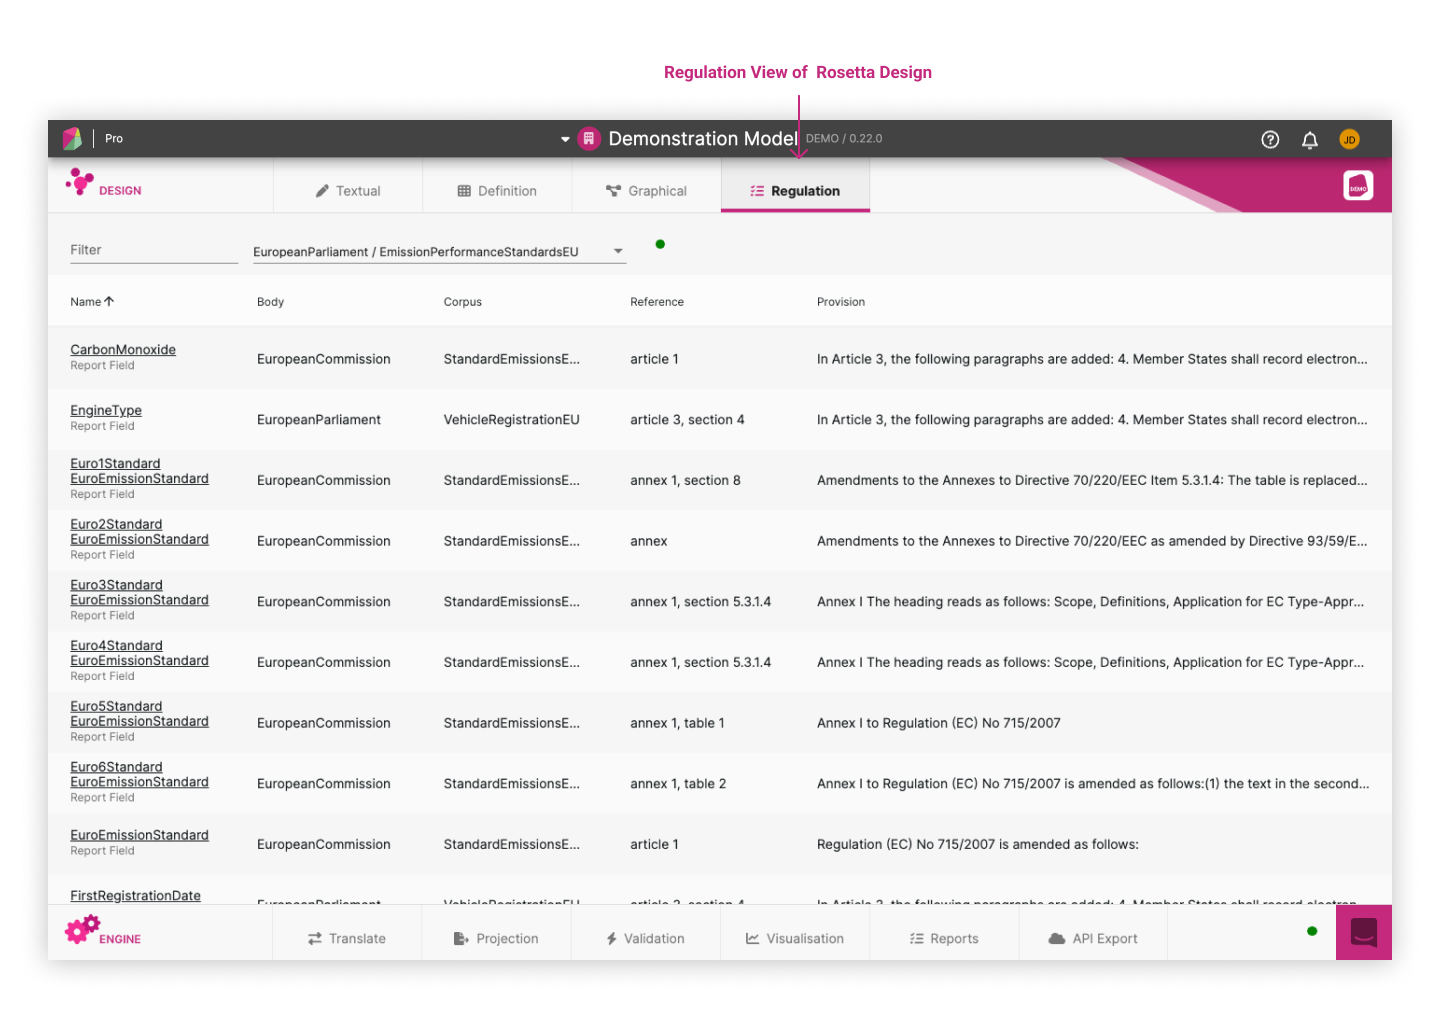
The result of this can be visualised in the Regulation View of Rosetta Design, shown below for an example based on the Demonstration Model for EU emission standards for vehicles. In the model itself, each rule ties the functional business logic (as shown on the right) to specific document references, including best practice and guidance (as shown on the left).
3. Define a regulatory report by assembling a set of rules 
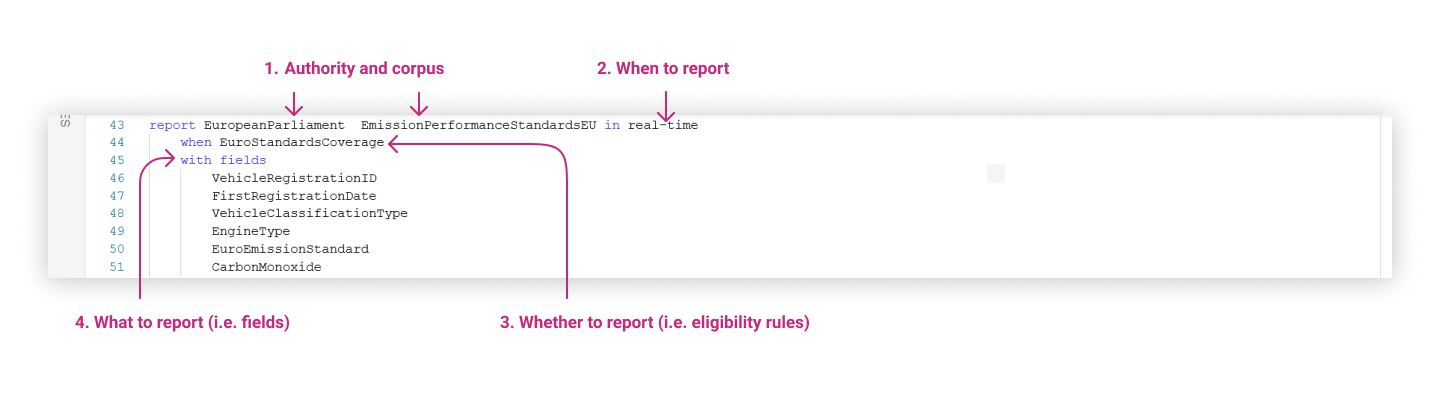
A regulatory report is defined as a data pipeline consisting of a collection of rules that together produce the reportable values required by the regulation. The ordering and naming of those rules aim to reproduce how reportable fields are defined in the relevant corpus.
The definition of a regulatory report in the regulatory model contains the following elements (with corresponding syntax):
- Name under which to report the fields:
report <Authority> <Corpus1> <Corpus2> <…> - When to report:
in <TimingRule> - Whether to report:
when <EligibilityRule1> and <EligibilityRule2> and <…> - What to report:
with fields <FieldRule1> <FieldRule2> <…>
An example based on the Demonstration Model illustrates the creation of a report called EmissionPerformanceStandardsEU with reportable fields such as Vehicle Registration Id, First Registration Date, Vehicle Classification Type etc.
Step 3: Test regulatory reporting on scenarios 
Once the user defines a regulatory report in the model, they can generate reports in real-time and visualise the results in the Reports panel in the Engine. Each report is executed on pre-defined set of test scenarios that represent input data into the reporting process and are assembled into a test pack.
A pre-defined set of test scenarios consists of predetermined situations used as input data for reporting. This data generates a report, which is then compared against predefined expectations to verify its integrity.
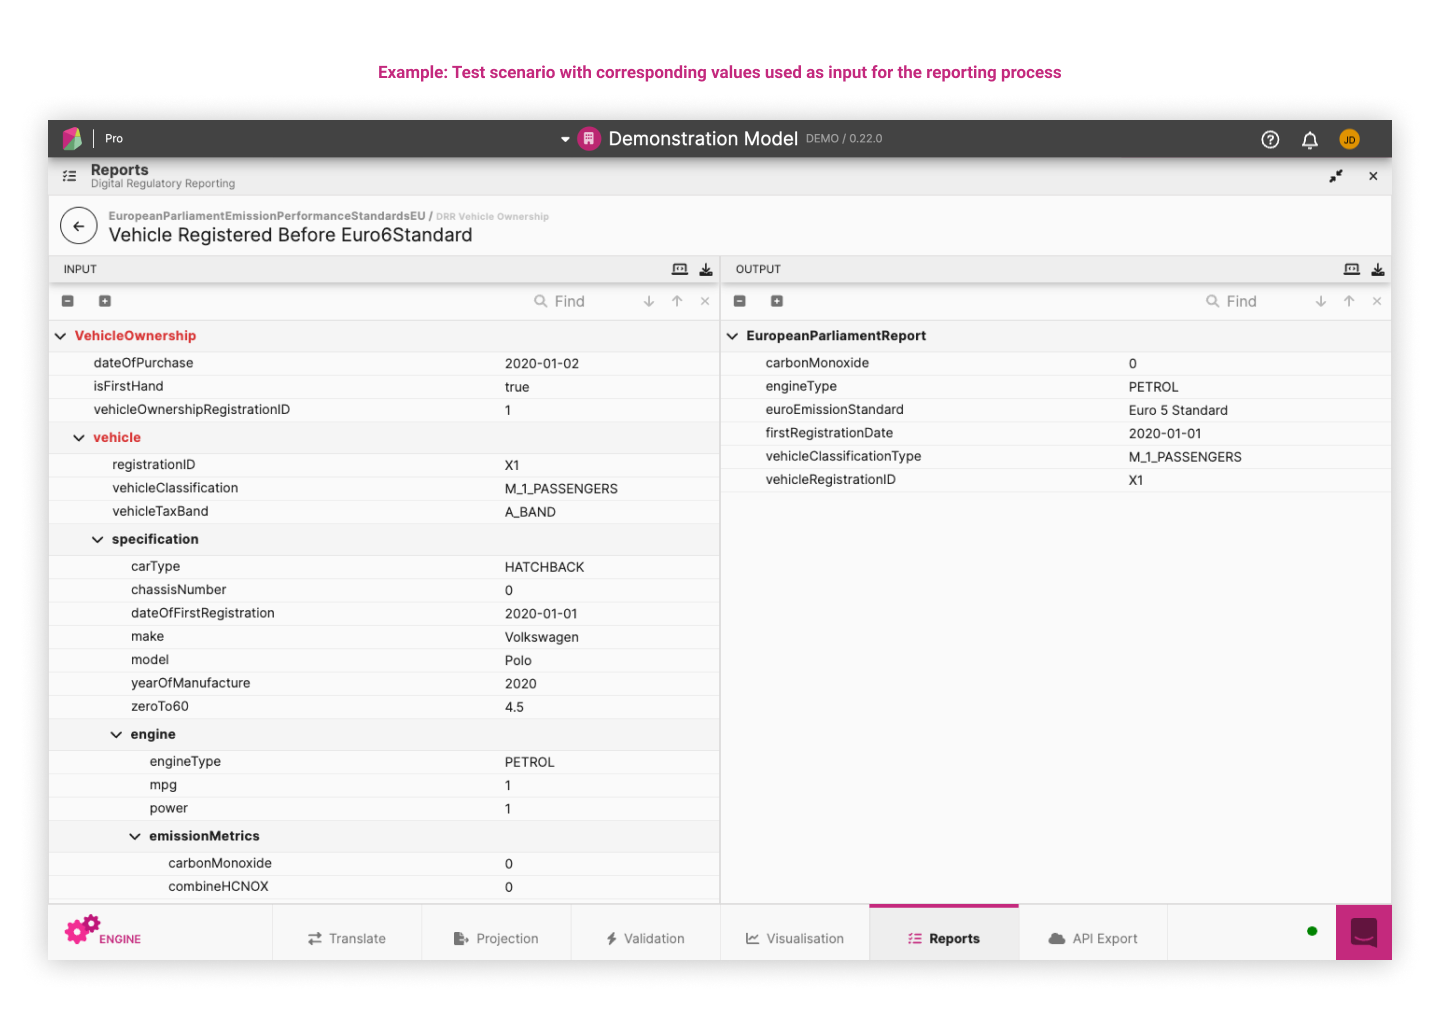
The following example based on the Demonstration Model shows the output of the EmissionPerformanceStandardsEU report based on one test pack that contains two test scenarios. The reported values, displayed as columns, each correspond to a reportable field defined in the What to report section of the report model.
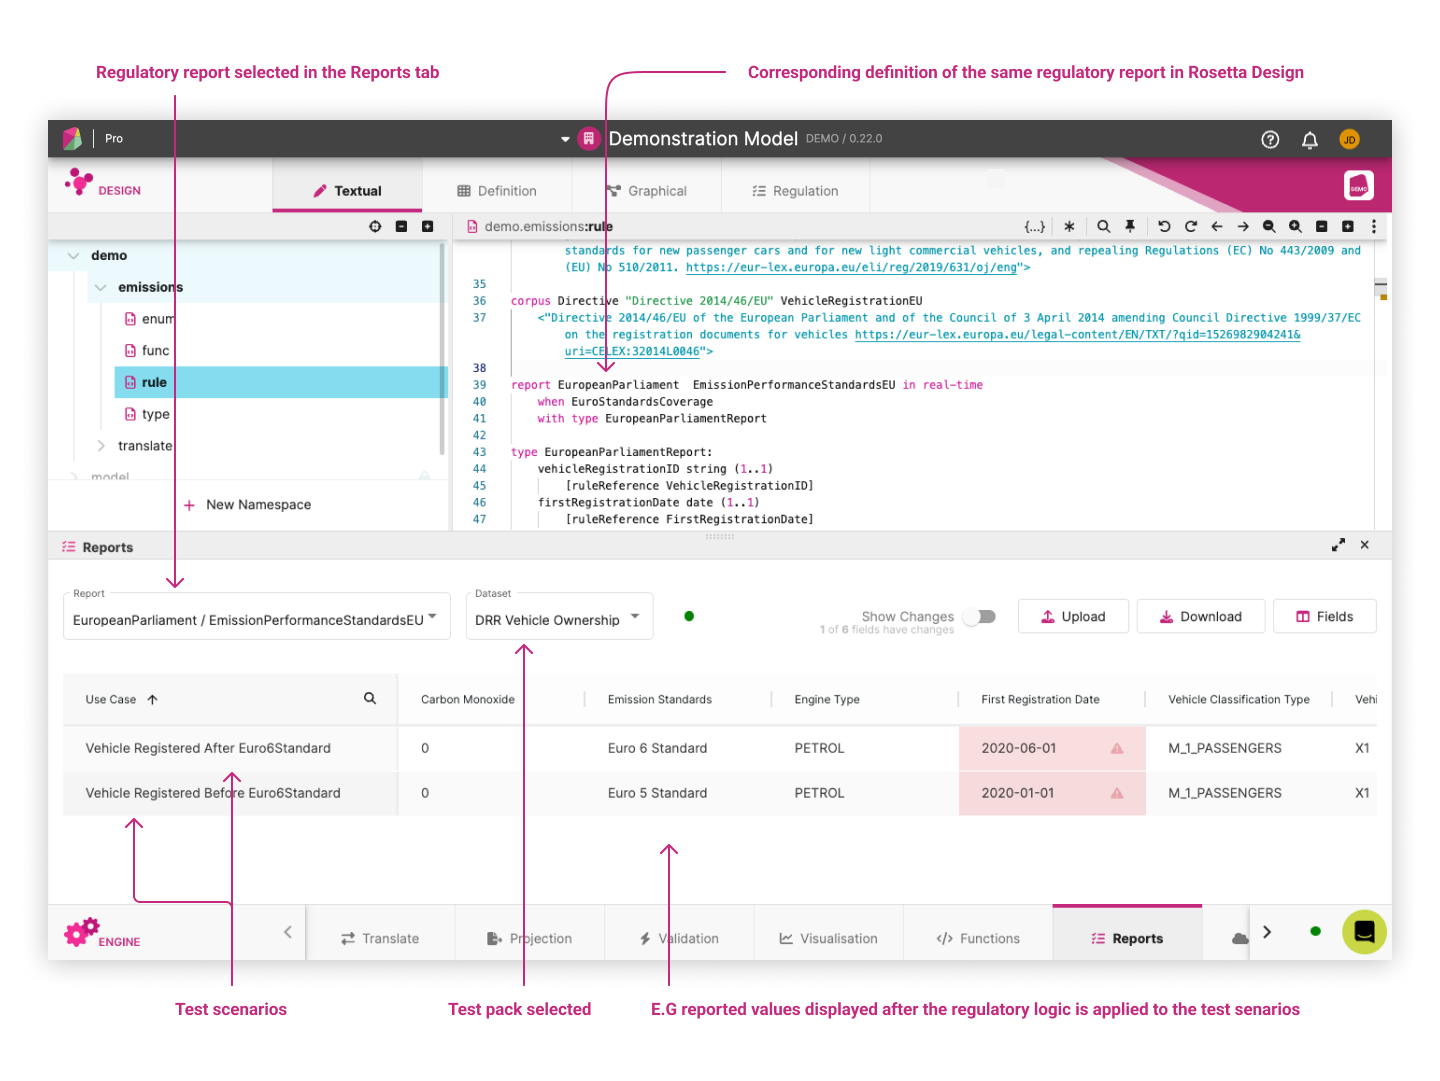
The test scenarios are a key component of the test-driven approach enabled by Rosetta. Based on these test scenarios, users can validate whether the regulatory report is generated with the expected reportable values. Rosetta allows users to develop those test scenarios by synthesizing input data from the model, on which the regulatory logic can be tested in real-time.
Each test scenario with its input values can be visualised by clicking on the test scenario name (as a hyperlink). The below example displays the values available in one test scenario associated with the test pack used for the above regulation.
It is possible that a report cannot be run against a test scenario and is rejected during sample upload. This can be caused when a test scenario’s JSON structure does not conform to the expected structure. In the event of an error the test scenario is rejected and an error message is presented in the upload dialog.
Step 4: Compare report against expected values 
When a reporting field is added or updated, the generated values will be compared against the expected values in the pre-defined test pack for that report. This has two effects:
- The first is that any future contributions to the model will then be tested as part of the model contribution process. Any model changes that cause a break in expectations will require the expectations to be updated (if the new expectations are valid) or alternatively maintained (prompting a rejection of the model contribution).
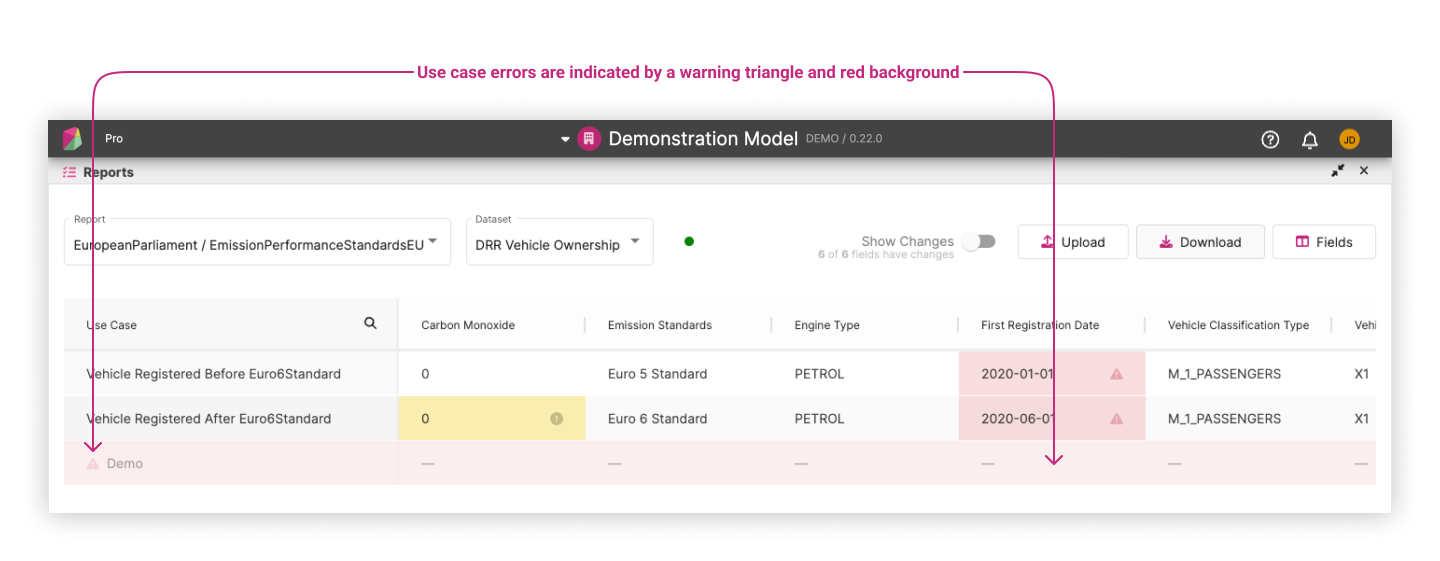
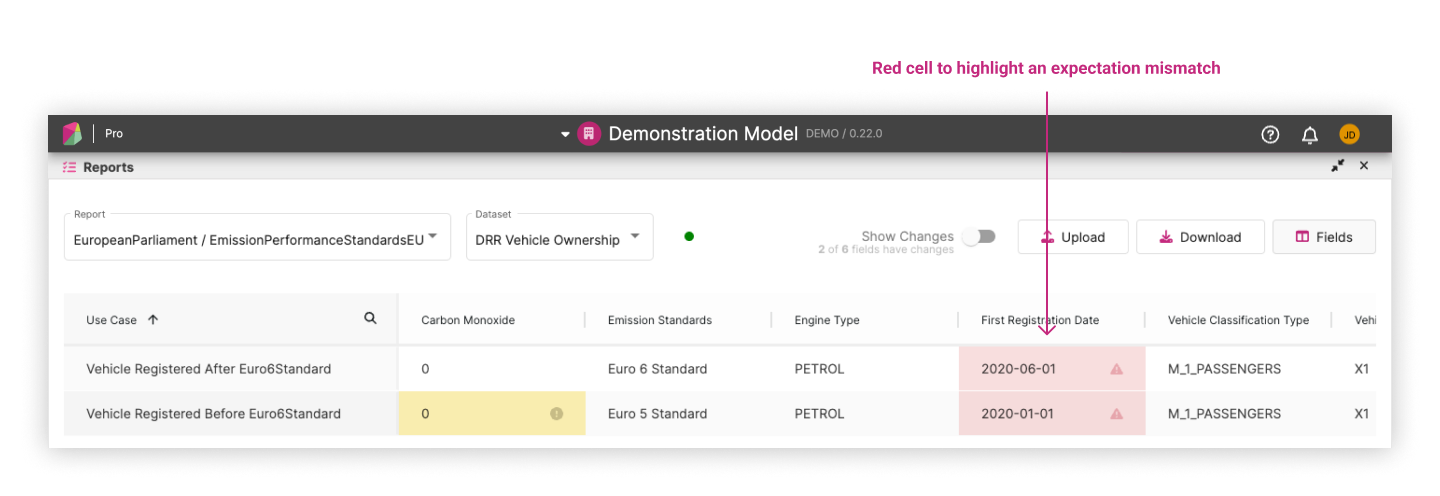
- The second effect of including expectations with reporting datasets is that when a user makes an update to their workspace, the resulting generated report can visually mark where the newly generated values and the expectations mismatch. This is displayed in the following example where mismatch cells are highlighted in red. Hovering over the warning triangle will display a tooltip that informs the user what the expected value was.
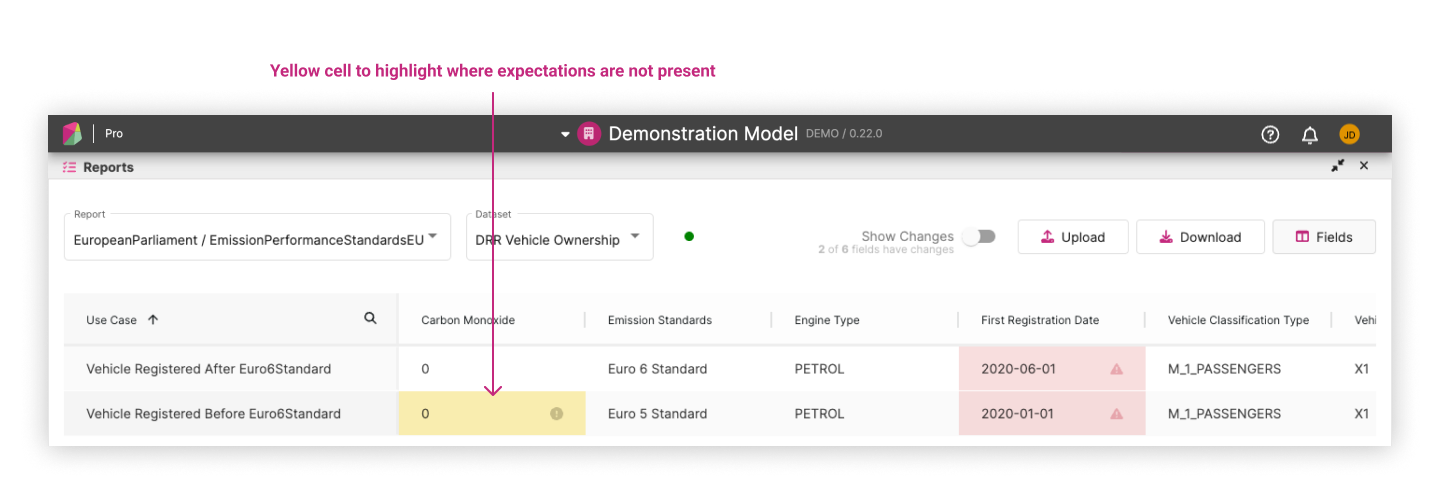
There are cases where expectations are not generated. This can occur when expectation generation is not yet implemented for a particular model or use case. There are other cases where it may be difficult to generate an expectation for individual data points such as a moving timestamp. In these cases, the cells in the report will be highlighted in yellow and a label for that cell will inform that there were no expectations available. An example of this can be seen in the following sample.
Step 5: Updating report expectations 
When the model generates values that don’t match the expectations, you can update the expectations. These expectation updates will be recorded in your workspace and included in your contribution when it is submitted.
Accepting expectations 
You can do this in two ways:
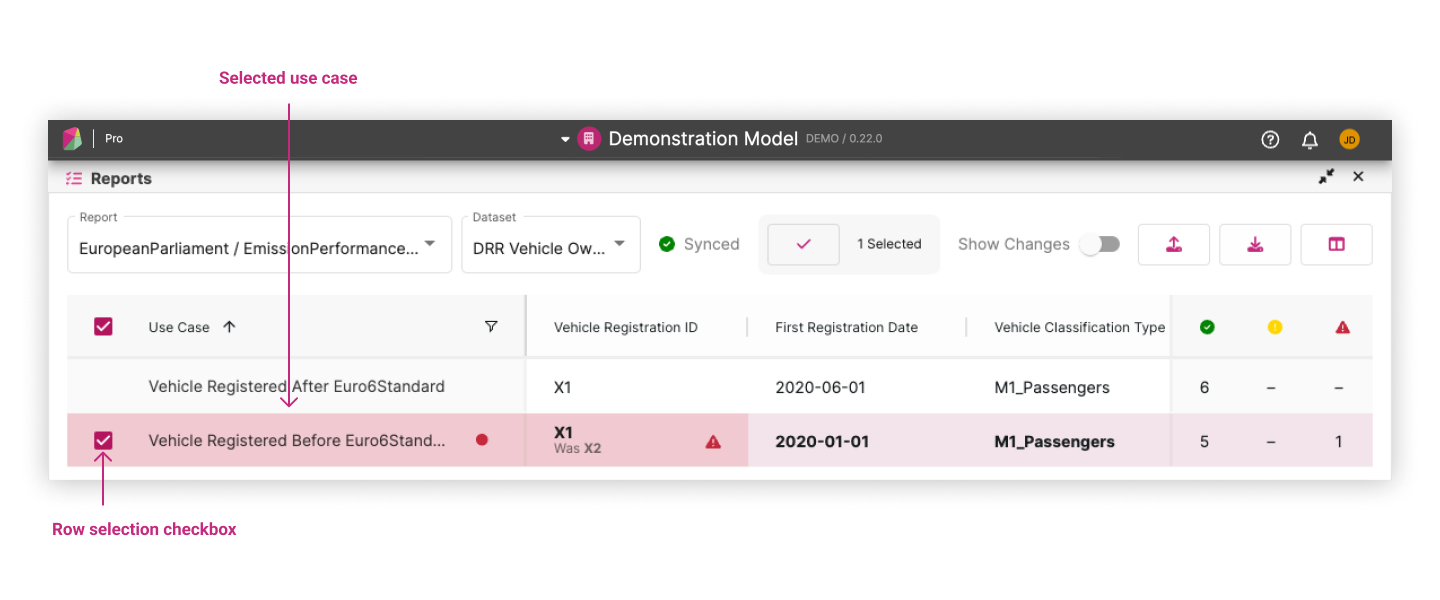
- Clicking the accept inline action in the use case column which appears when you hover over the row
- Select multiple rows by clicking the checkbox at the beginning of each row. Once you’ve selected all the rows you want to accept, click the accept button in the header
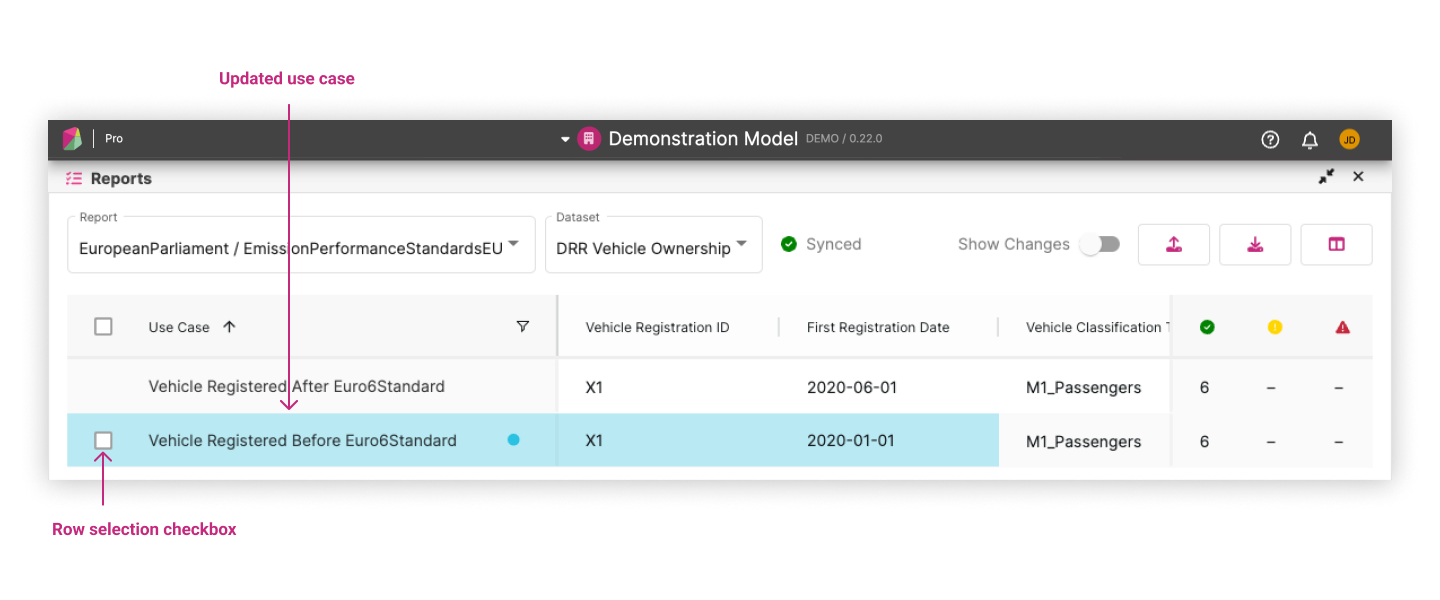
Either way, this will pop up a confirmation. After accepting, the cells with mismatched values will be updated and highlighted.
You can repeat this process as many times as you need.
Discard expectations 
If you want to revert a row back to its original expectation after accepting it, you can do this in two ways:
- Clicking the discard inline action in the use case column which appears when you hover over the row
- Select multiple rows by clicking the checkbox at the beginning of each row. Once you’ve selected all the rows you want to discard, click the accept button in the header
Again, this will prompt a confirmation. After confirming, the cells will be reverted to their original expectations.
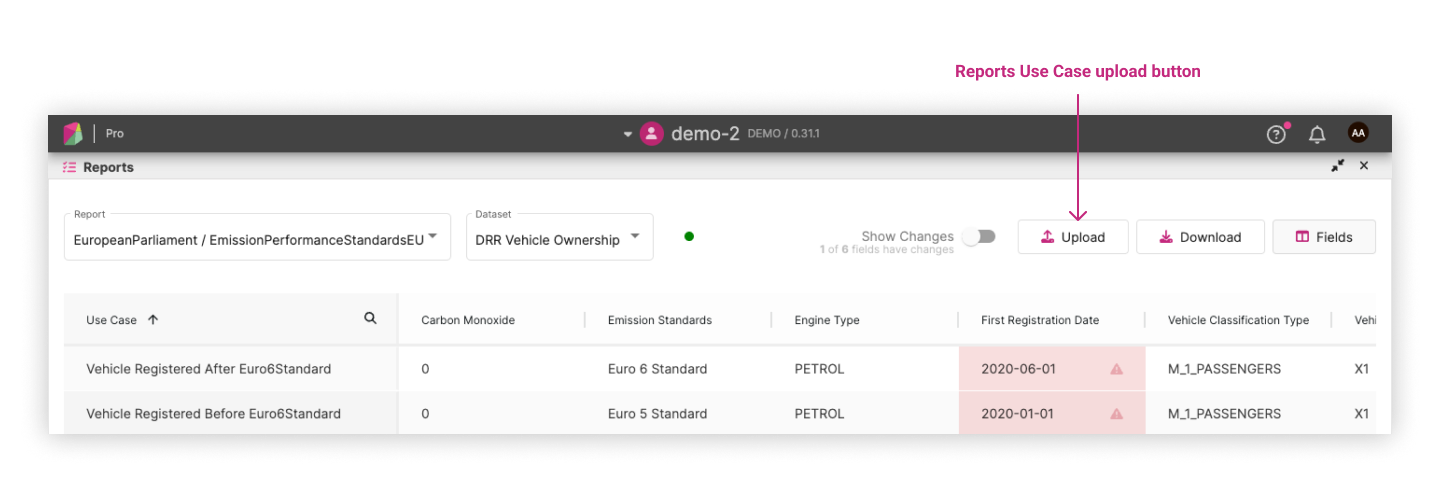
Step 6: Upload your own use cases 
Use the Upload button on the reports screen:
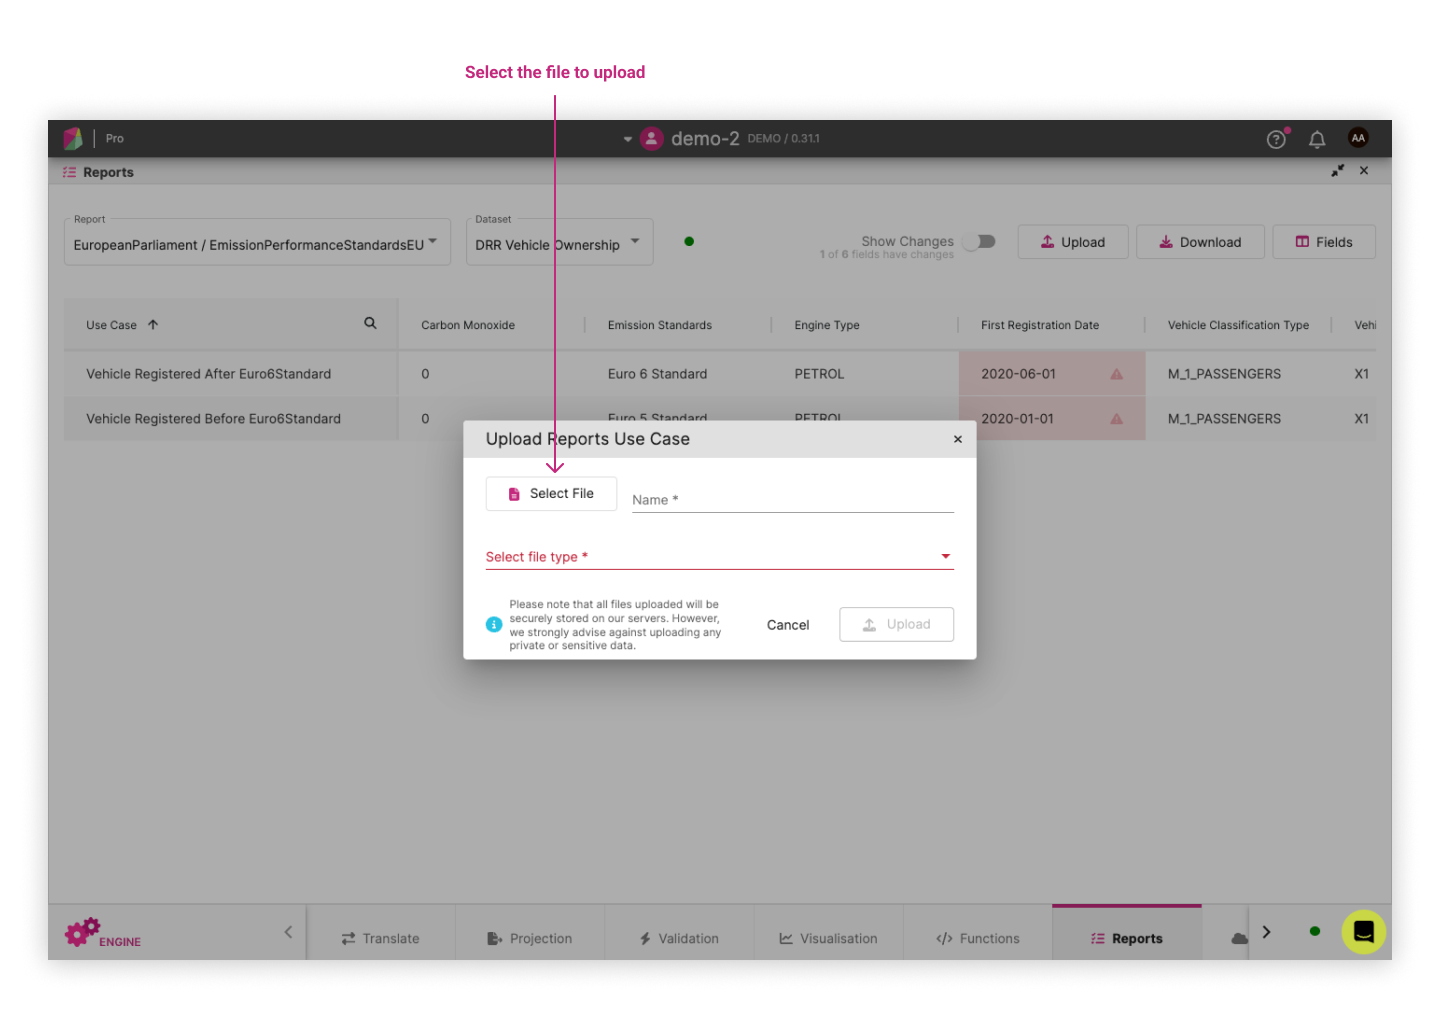
Clicking on the button will open a dialog where you can select the file to upload:
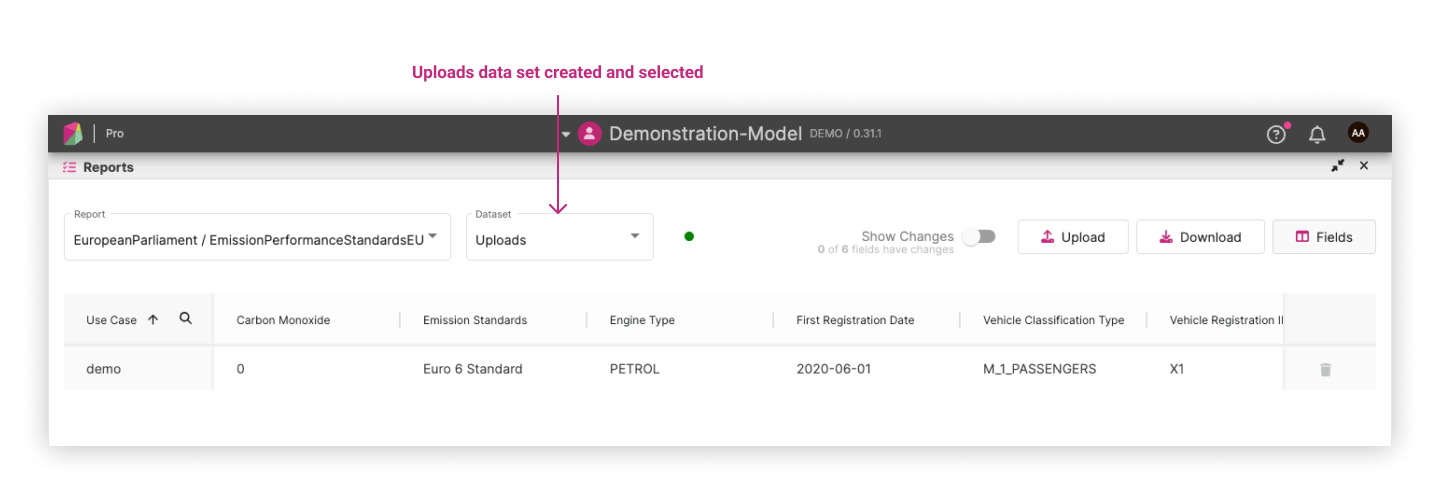
After uploading, the report will automatically run indicated by the spinner. Once the spinner has stopped, a new “Uploads” dataset will automatically be selected for you:
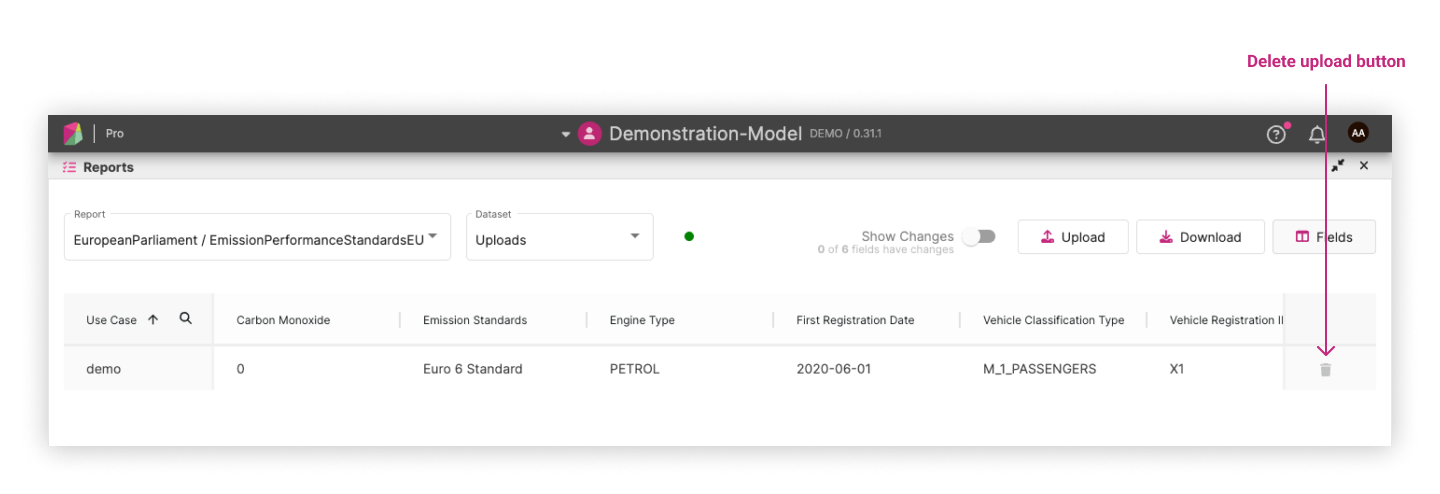
Uploads can be deleted via a delete button as shown in the following screenshot:
Useful Features 
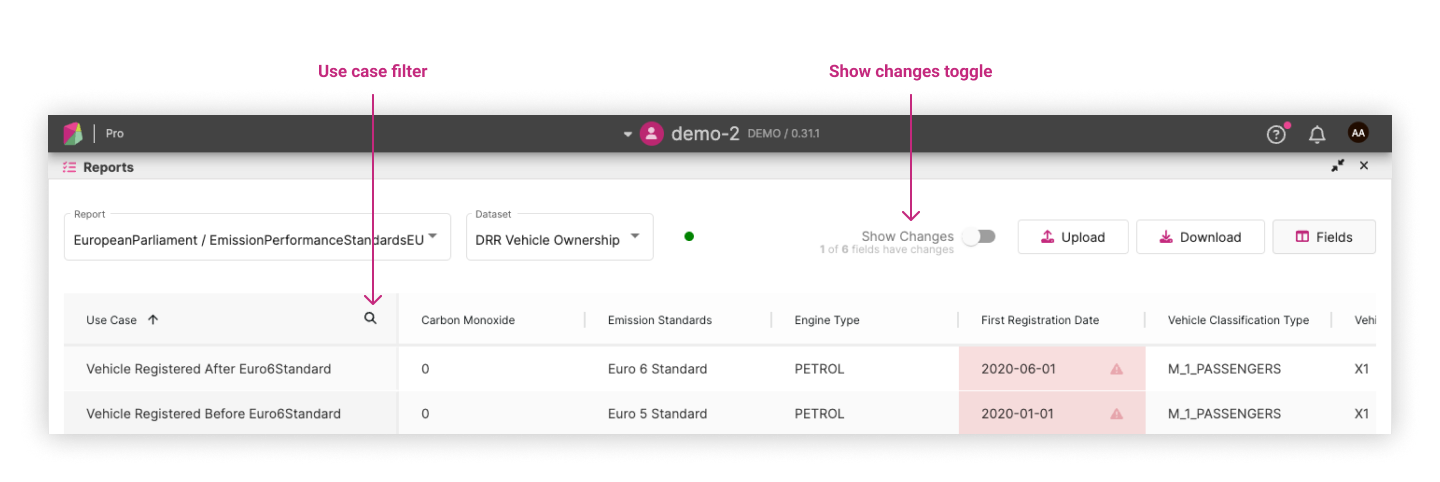
There are two useful features: “Show Changes” and “Use Case Filtering”. These features enhance the user experience by allowing users to focus on relevant information and narrow down the displayed data.
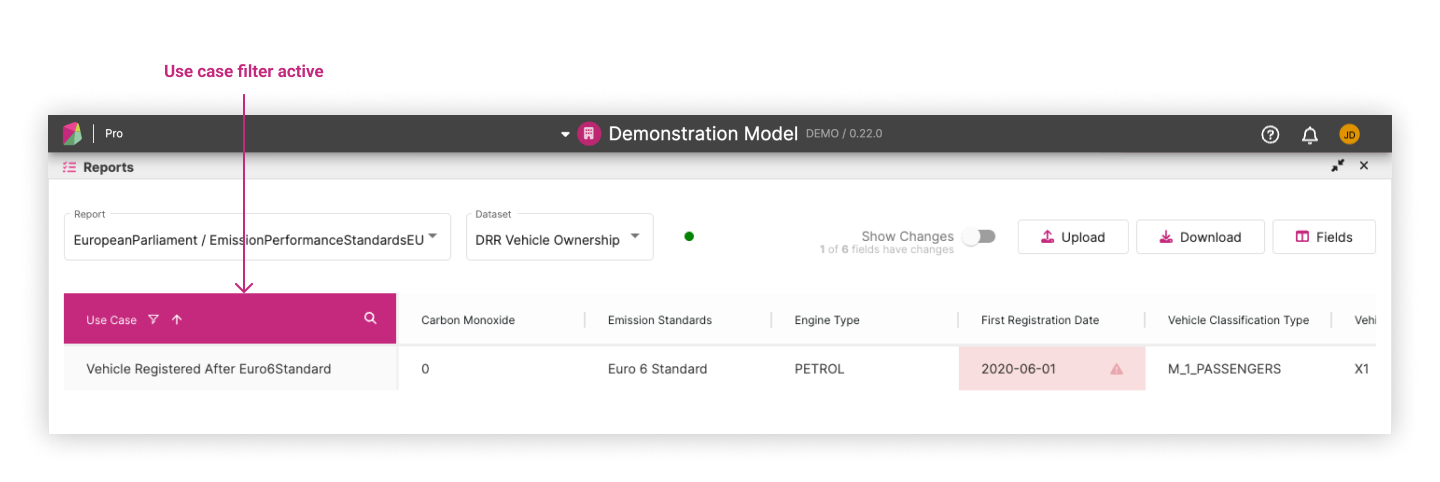
Show Changes 
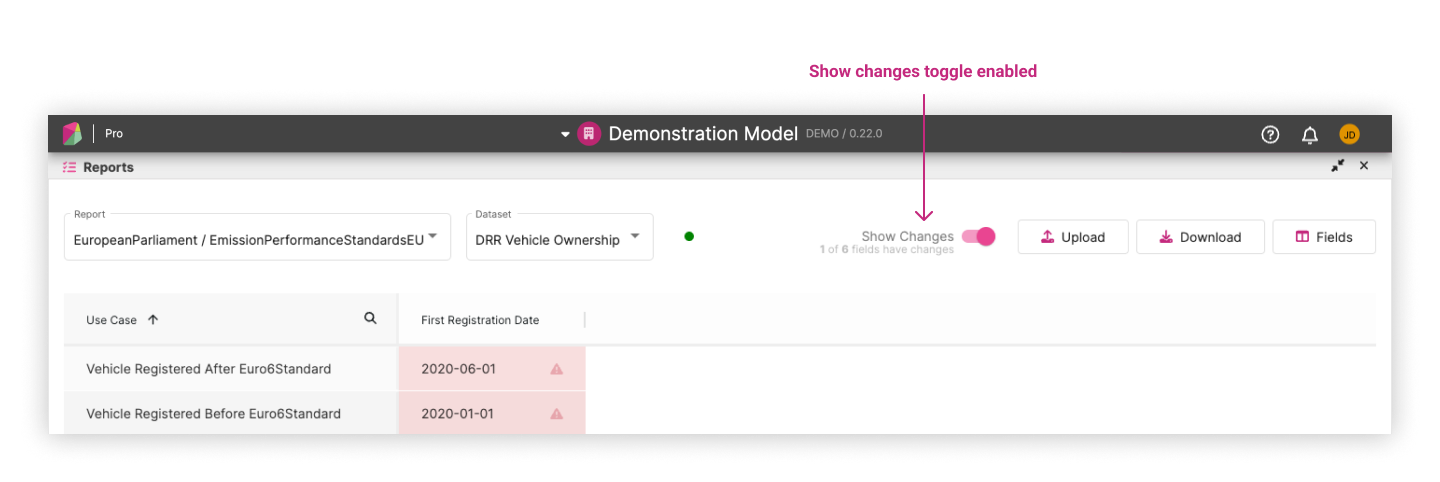
This toggle hides fields and use cases without any changes, allowing users to concentrate on the cells that have changed.
Use Case Filtering 
This allows users to filter the displayed data based on specific use cases.
Data Lineage 
Data Lineage shows an execution graph of all function calls run in a pipeline. It lets you inspect how data moves and changes at each stage, from input to output.
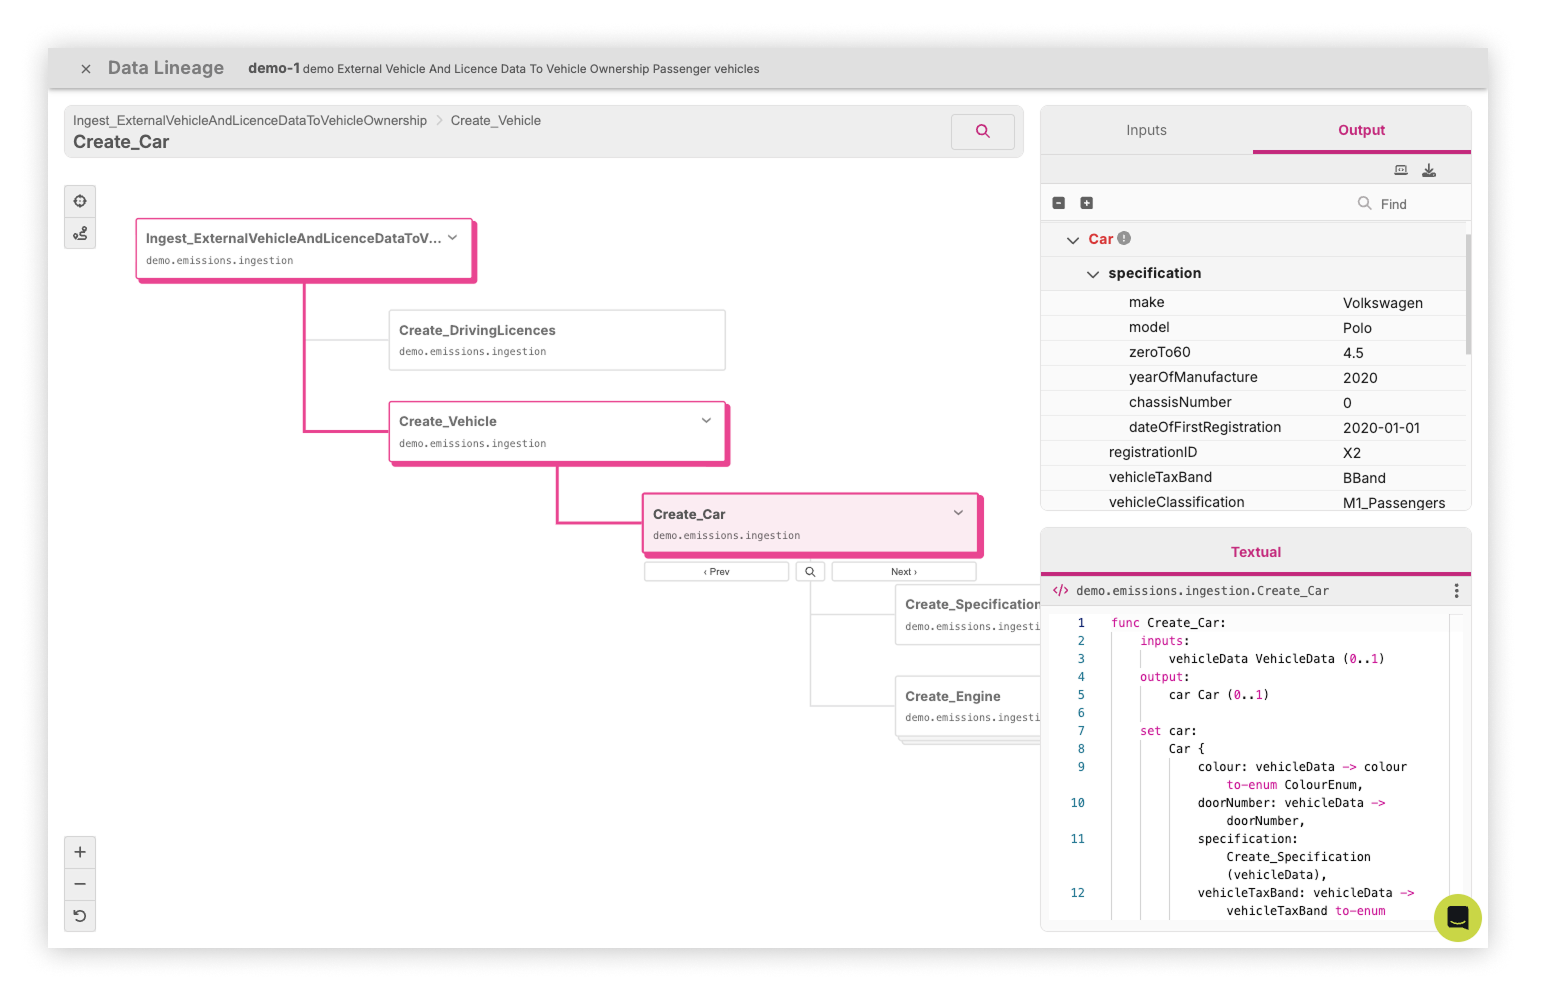
You can use Data Lineage to:
- follow the data transformations for a given field through each function call
- compare input and output function call
- view associated references/documentation
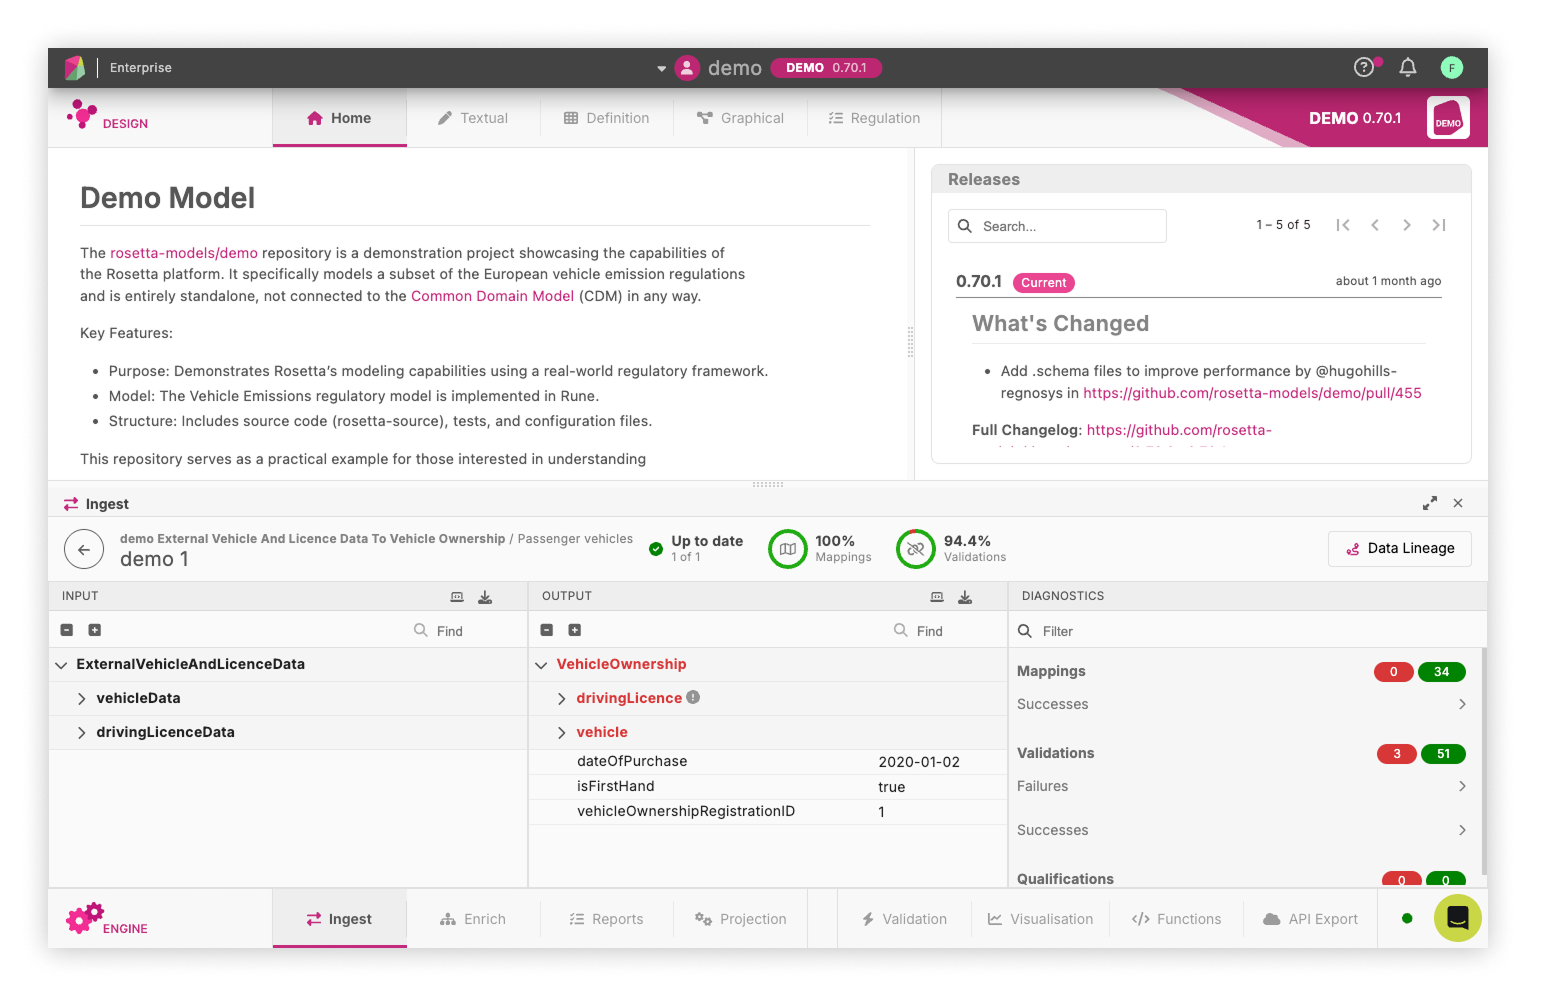
To open Data Lineage, click a sample row to view its details, then select the Data Lineage button. This opens the data lineage execution graph.
Navigating the lineage graph 
To explore the graph:
- use breadcrumb and search to jump to a specific function call
- use controls to zoom, centre, and reset the view
- enable selected-path focus to show only the functions called to get to the currently selected function
When you select a function, all detail panels update to match that selection.
Comparing input and output 
Use the Input and Output tabs for the selected function:
- Input shows the payload before transformation
- Output shows the payload after transformation
When available, you can select values in these views to jump to the related lineage function.
Reviewing logic and documentation 
Use the details tabs to inspect context:
- Textual shows the Rune syntax and logic of the function and supports navigation to the symbol
- Documentation shows linked regulatory provisions for the selected logic
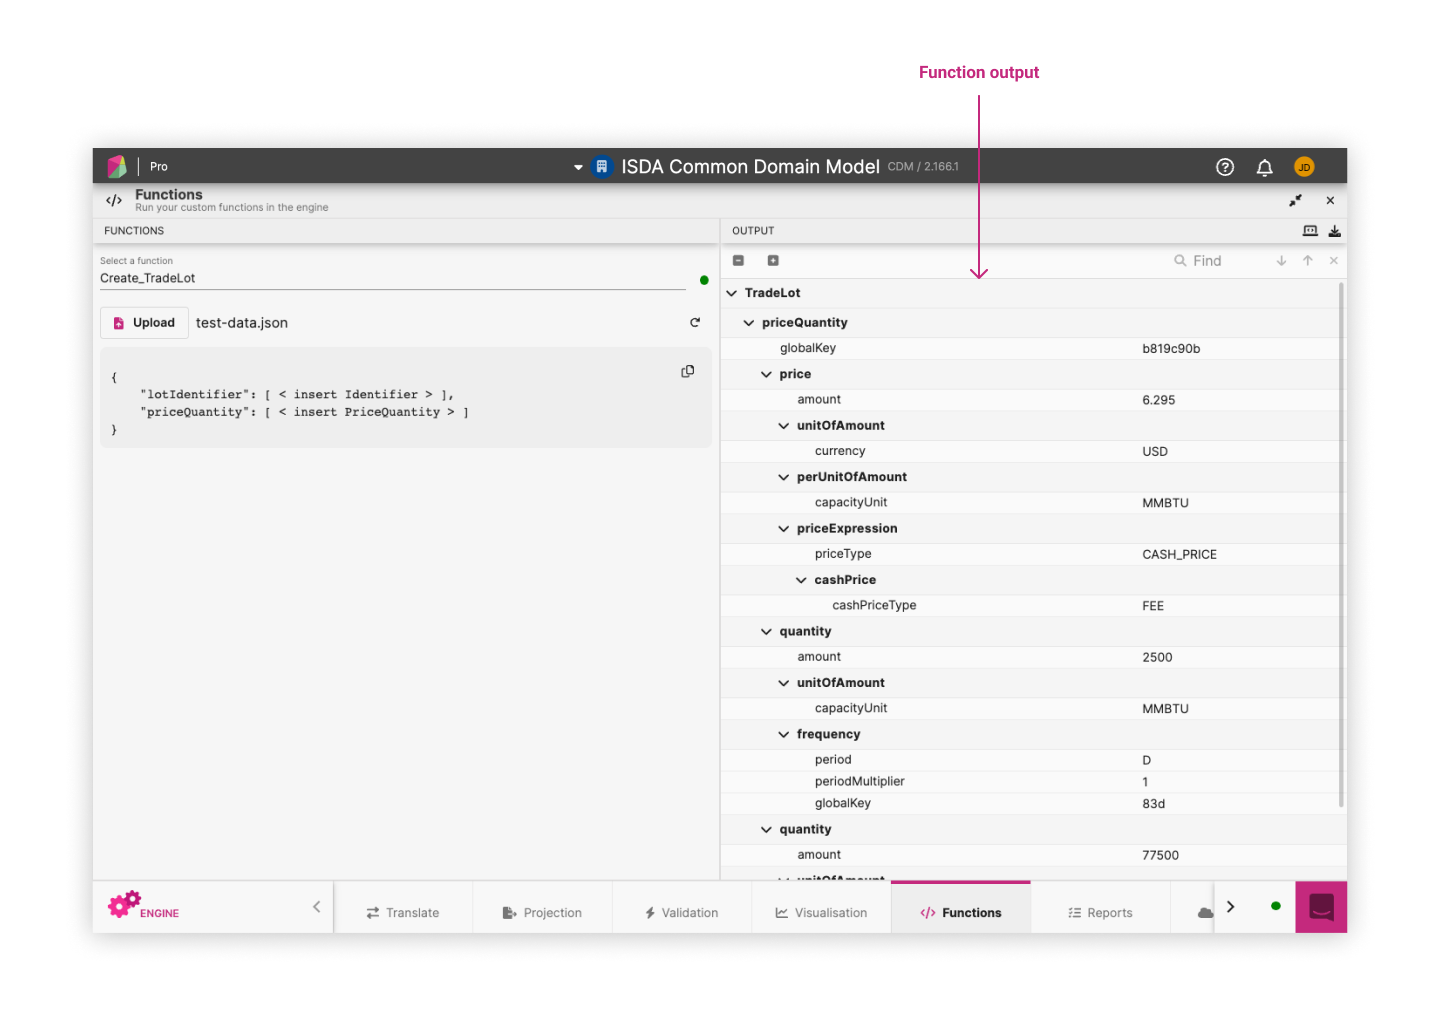
Running Custom Functions 
The Functions panel displays all defined functions (func) in your model and allows you to run them against custom JSON.
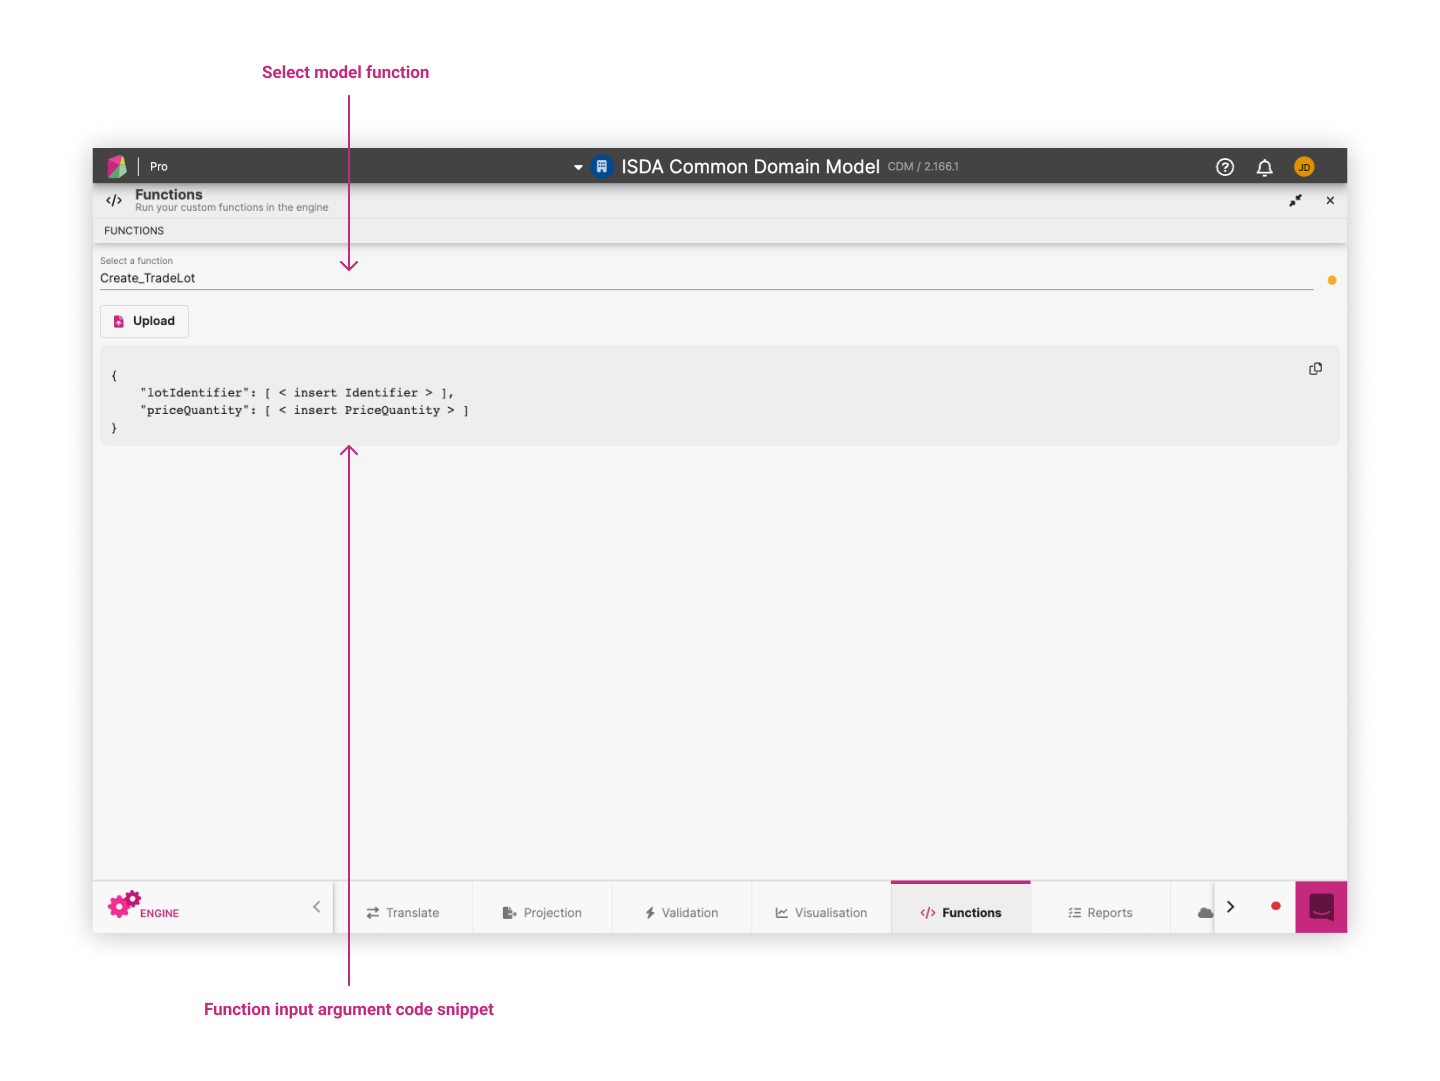
After running the function with your custom JSON the output panel displays a rosetta object.